 Mayor's Office of Contract Services311
 Search all NYC.gov websites
Add Vendor Users and Assign Roles
Learn how to add users and assign roles in your PASSPort Vendor Profile.
For information on how to identify LL34 contacts in your Vendor Profile, view Identify Your Organization's LL34 Contacts.
Before We Begin
The steps below can be completed by users provisioned with the role:
Vendor Admin
Note: The individual who submitted the PASSPort account request is automatically assigned a Vendor Admin role and can complete the steps in this guide. MOCS recommends that the original Vendor Admin assign at least one other contact the Vendor Admin role to prevent account access issues.
Add New Contacts to Your Vendor Team
- From PASSPort Central, click Profile in the top navigation menu.
- Click Vendor Profile from the drop-down menu.

Your organization's vendor profile opens, and the Basic Information tab is visible.
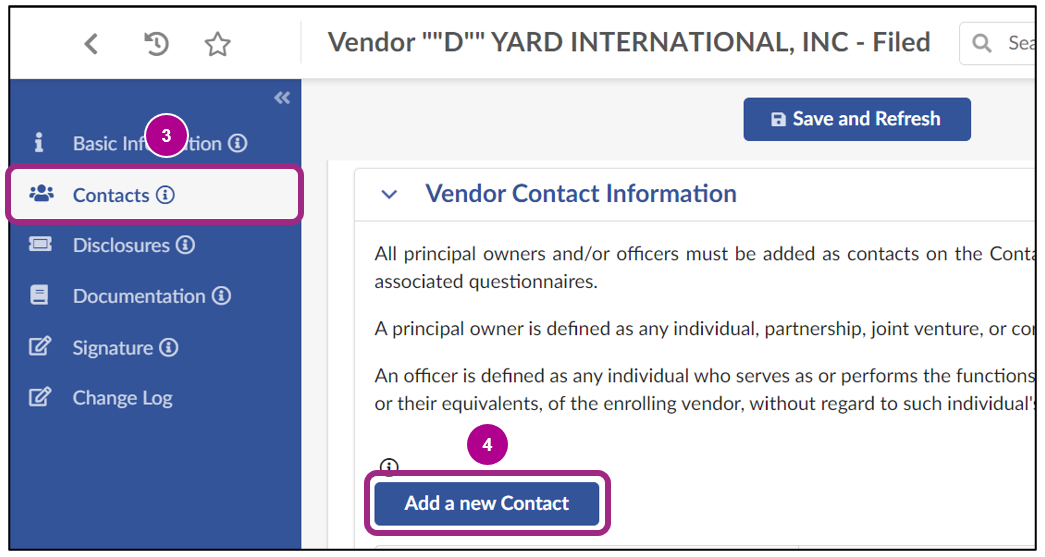
- Go to the Contacts tab using the left navigation menu.
- Scroll down to the Vendor Contact Information section and click the Add a new Contact button.

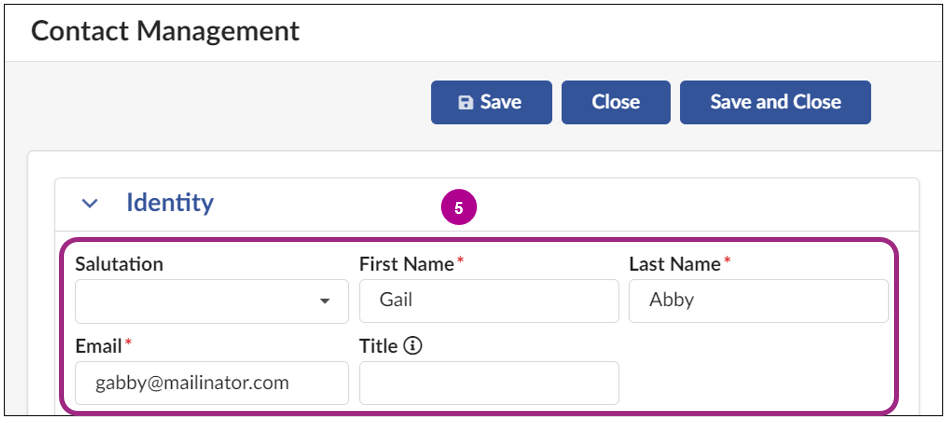
The Contact Management pop-up window opens.
- Enter the new contact's First Name, Last Name, and Email Address in the Identity section.
- Click the Save and Close button at the top of the window to return to the Contacts page.


Each new contact must have a unique email address and then be assigned at least one system user role. To gain access to PASSPort, the newly added contact must Register a NYC.ID using the same email address that was entered by the Vendor Admin when adding the new contact. The NYC.ID acts as the user's PASSPort login credentials.
Assign Roles to a Contact
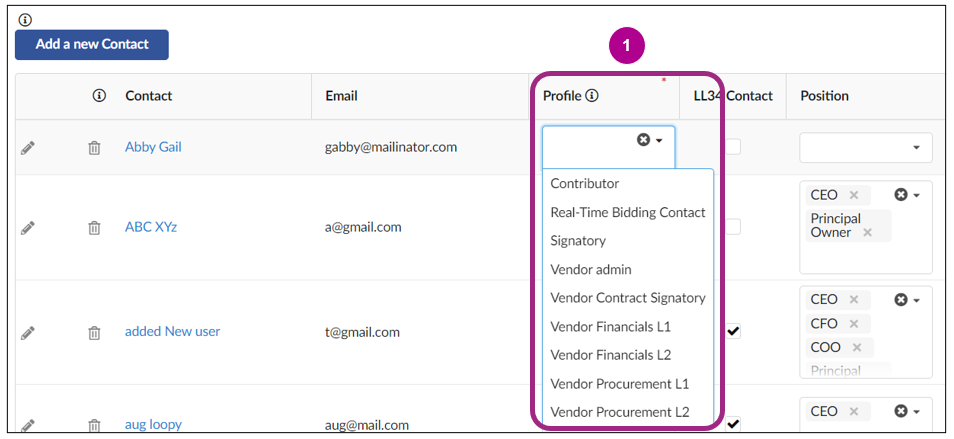
Newly added contacts appear in a table below the Add a new Contact button. Each contact must be assigned at least one user role in the Profile column of this table. Multiple roles can be assigned to a single user. There is no limit to the number of roles a user can be assigned.
- To add a user, click into the drop-down field within the Profile column and select one or more user roles from the list.
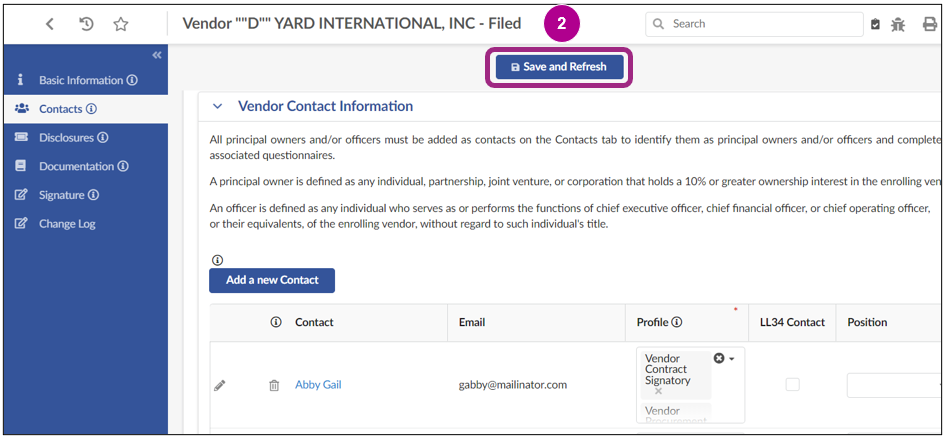
- Click the Save and Refresh button near the top of the page.


Task Authorizations by User Role
To effectively assign a user role, you must determine what tasks the user will be performing. The following tables provide an overview of the current task authorizations by user role.
PASSPort Enrollment Tasks
| Task | Vendor Admin | Contributor | Signatory | Procurement L1 | Procurement L2 | Financials L1 | Financials L2 | Vendor Contract Signatory |
|---|---|---|---|---|---|---|---|---|
| Enter Information | X | X | X | |||||
| Click the Check Progress button | X | |||||||
| Sign Enrollment Package | X | |||||||
| Submit Enrollment Package | X | X |
Account Management Tasks
| Task | Vendor Admin | Contributor | Signatory | Procurement L1 | Procurement L2 | Financials L1 | Financials L2 | Vendor Contract Signatory |
|---|---|---|---|---|---|---|---|---|
| Add/Edit Contacts and User Roles | X | |||||||
| Initiate Change Request | X | X | X | |||||
| Sign Change Request / Certificate of No Change | X |
RFx Response Submission Tasks
| Task | Vendor Admin | Contributor | Signatory | Procurement L1 | Procurement L2 | Financials L1 | Financials L2 | Vendor Contract Signatory |
|---|---|---|---|---|---|---|---|---|
| Enter Information | X | X | X | X | X | X | X* | |
| Initiate/Submit/Cancel Response | X | X* | X | X | X | X | X* | |
| Add/Edits Contacts in RFx Setup Team Tab | X | X* | X | X |
Note:
*Contributor – Users with this role can click the Participate in RFx button and the I acknowledge receipt of this RFx button for Competitive Sealed Bids. This role can also Add/Delete contacts in the Setup Team tab. Users with the Contributor role cannot perform these actions for Competitive Sealed Proposals.
*Vendor Contract Signatory – Users with this role can click the Participate in RFx button. However, this role can only work in the Subcontractor and LL34 tabs in the RFx Response. Users with the Vendor Contract Signatory role cannot edit the Questionnaire tab or view the Item tab in the RFx.
HHS PQL Application Tasks
| Task | Vendor Admin | Contributor | Signatory | Procurement L1 | Procurement L2 | Financials L1 | Financials L2 | Vendor Contract Signatory |
|---|---|---|---|---|---|---|---|---|
| Initiate/Update Application | X | X | ||||||
| Enter Information | X | X | X | |||||
| Sign/Submit Application | X | X |
Contract Completion Tasks
| Task | Vendor Admin | Contributor | Signatory | Procurement L1 | Procurement L2 | Financials L1 | Financials L2 | Vendor Contract Signatory |
|---|---|---|---|---|---|---|---|---|
| Add/Edit Contact in the Contract Setup Team Tab | X | X | ||||||
| Upload Vendor Documents | X | X | ||||||
| Review Contract Agreement (Contract Authoring) | X | X | X | |||||
| Sign Contract (DocuSign) | X |
PASSPort Financials Tasks
| Task | Vendor Admin | Contributor | Signatory | Procurement L1 | Procurement L2 | Financials L1 | Financials L2 | Vendor Contract Signatory |
|---|---|---|---|---|---|---|---|---|
| Create/Submit an Invoice or Invoice Deduction | X | X | X | |||||
| Create/Submit PO Change Request (Budget Mod) | X | X | ||||||
| Edit an Invoice / Budget Modification | X | X |
Subcontractor Management Tasks
| Task | Vendor Admin | Contributor | Signatory | Procurement L1 | Procurement L2 | Financials L1 | Financials L2 | Vendor Contract Signatory |
|---|---|---|---|---|---|---|---|---|
| Add / Edit Subcontractor Information | X | X | X | |||||
| Submit a Subcontractor for Approval | X | X | X | |||||
| Create/Submit a Subcontractor Modification Request | X | X | X | |||||
| Record a Subcontractor Payment | X | X | X | X | X |
Best Practices for Vendor Admins Managing Contacts
- To prevent account access issues, at least two individuals should have the Vendor Admin role.
- Follow the principle of least authorizations so that users only have the permissions needed to complete their job. This helps to reduce inadvertent errors.
- Every contact must be assigned at least one role to log in to PASSPort. Each contact, including yourself, can be assigned multiple roles. To remove access, either remove the role(s) or delete the contact.
- A Vendor Admin must assign the Signatory and Vendor Contract Signatory roles to at least one contact (which can be themselves).
- While only three roles are needed to perform all tasks in PASSPort (Vendor Admin, Signatory and Vendor Contract Signatory), adding vendor contacts with task-specific roles is encouraged.
- Confirm the Vendor Admin role or Vendor Procurement L2 role is assigned to at least one individual with authorization to complete the LL34 Compliance tab.
- For RFx Responses, adding users to the RFx Setup Team enables them to perform all activities for a specific RFx Response. Refer to RFx Response Authorizations job aid for details.
- Refer to Webinar: Assigning User Roles in PASSPort for a video walkthrough of the steps in this guide.


