
 Mayor's Office of Contract Services311
 Search all NYC.gov websites
Respond to RFx in PASSPort
Found a contract opportunity in PASSPort to pursue? That's great!
Follow these instructions on how to submit your bid or proposal in response to the RFx.
- Important Terms
- Respond to an RFx: Overview
- View RFx Details
- Acknowledge the RFx
- How to Use the Discussion Forum
- Add RFx Contributors
- Prepare Your RFx Response
- Questionnaire Tab
- Documents Tab
- Item Tab
- LL34 Compliance Tab
- Subcontractors and Joint Ventures Tab
- M/WBE Requirements Tab (Read-Only)
- Submit Your RFx Response
- Duplicate an RFx Response
- Next Steps
Before We Begin
The steps below can be completed by users provisioned with the roles:
- Vendor Admin
- Vendor Procurement L2
- Vendor Procurement L1
Important Terms
Here are some key terms associated with responding to contracting opportunities in PASSPort:
RFx Status
RFx Status shows the current phase of a solicitation in PASSPort:
- Planned: The RFx is in the planning stages.
- Released: The RFx is accepting vendor responses.
- Responses Received: The agency no longer accepts RFx responses.
- Selections Made: The agency selected vendor(s) for contract awards.
- Closed: The solicitation process has ended.
Due Date
Responses must be submitted before the Due Date as Agencies can stop accepting responses at any time on the due date. We recommend submitting responses at least 48 hours in advance of the due date.
Prequalification
Some RFx require vendors to get prequalified to respond to a particular solicitation. For example, the Health and Human Service Prequalification (HHS PQL) is a requirement of HHS providers to respond to HHS RFx in PASSPort. To learn more, see HHS Accelerator Prequalification. Check with the City Agencies in your line of work for other prequalification lists.
RFx Response
A RFx Response (Response Submission) to a solicitation released in PASSPort is the broad term for how a vendor answers the RFx. Examples of specific responses are proposals or bids.
RFx Response Status
The Response Status reflects the current stage of your RFx response:
- In Progress: You acknowledged the RFx which generated a draft RFx response. You have not yet submitted the response.
- Submitted: You successfully submitted a RFx response.
- Canceled: You canceled the RFx response, which cannot be recovered.
- Withdrawn: You withdrew a submitted RFx response, which cannot be recovered.
Addendum
An Addendum is a document published when an Agency makes an update to an RFx, such as a change in the due date. It's a document that details the changes. PASSPort notifies the participating vendors when an addendum has been issued.
Round
A new Round refers to an Agency making substantial changes to an RFx (such as a change in the scope), requiring vendors to submit new responses to the new round. An addendum is published upon agencies issuing a new round.
Selection Status
A Selection Status will only display after the selections have been made by the Agency, meaning the Agency has evaluated vendor responses and has made award selections. The selection status will read either Selected or Not Selected. Vendors will receive a notification upon award selection.
For more procurement terms and definitions, see the Important Terms section of the Find Contracting Opportunities guide and refer to the MOCS Glossary.
Respond to an RFx: Overview
Responding to an RFx consists of the following steps:
- Study the RFx: Thoroughly examine all RFx details to confirm your organization is qualified and has sufficient time to respond.
- Acknowledge the RFx: In some cases, you must acknowledge receipt of the RFx and confirm your intent to submit a response.
- Prepare Your Response: Complete all required sections of the RFx response.
- Submit Your Response: Review your entries and submit the response well before the due date.
View RFx Details
Carefully study all sections of the RFx to make an informed decision about whether your organization wishes to respond to this RFx:
- Summary including RFx status, funding Agency, EPIN, number of contracts, and procurement value. Only RFx in Released status are open to accept vendor responses!
- Description lists basic information about the RFx and what the Agency is looking to procure.
- Key Dates provides the Anticipated Contract Start and End Dates, Release Date, and Due Date.
- Documents lists supplemental material provided by the contracting agency for additional context for the RFx. Note: If an agency issues an addendum, a summary document will be available in the Document section outlining the changes.
To learn more about how to view RFx details, see Find Contracting Opportunities.
Key Information to Look Out For:
- Countdown Timer: A timer at the top of the page shows how much time remains until the due date. Aim to submit your response at least 48 hours in advance of the due date.
- Summary section: This section includes the agency's contact email address.
- Key Dates section: It not only lists the RFx due date, but also any deadline for submitting questions to the agency which may be multiple days in advance of the due date.
- Pre-Proposal Meetings: Any invitations to pre-proposal meetings (in-person or virtual) will be listed here.
- Documents: Download all available documents, including details on the opportunity, vendor guidance, and required templates. Note: Agencies also upload addenda and new round notices to this section.
Acknowledge the RFx
Before an RFx response can be started, some RFx require vendors acknowledge receipt of the RFx and confirm that they intend to respond to the RFx.
Acknowledging an RFx must be completed by a Vendor Admin. Discuss internally who is best suited for this task. Only the designated Vendor Admin can grant colleagues access to working on the RFx response later in the process.
- In the RFx, click the Participate in RFx button.
To learn more about finding opportunities, see Find Contracting Opportunities.

The page refreshes.
- In the Response Activity section, click the I acknowledge receipt of this RFx button.
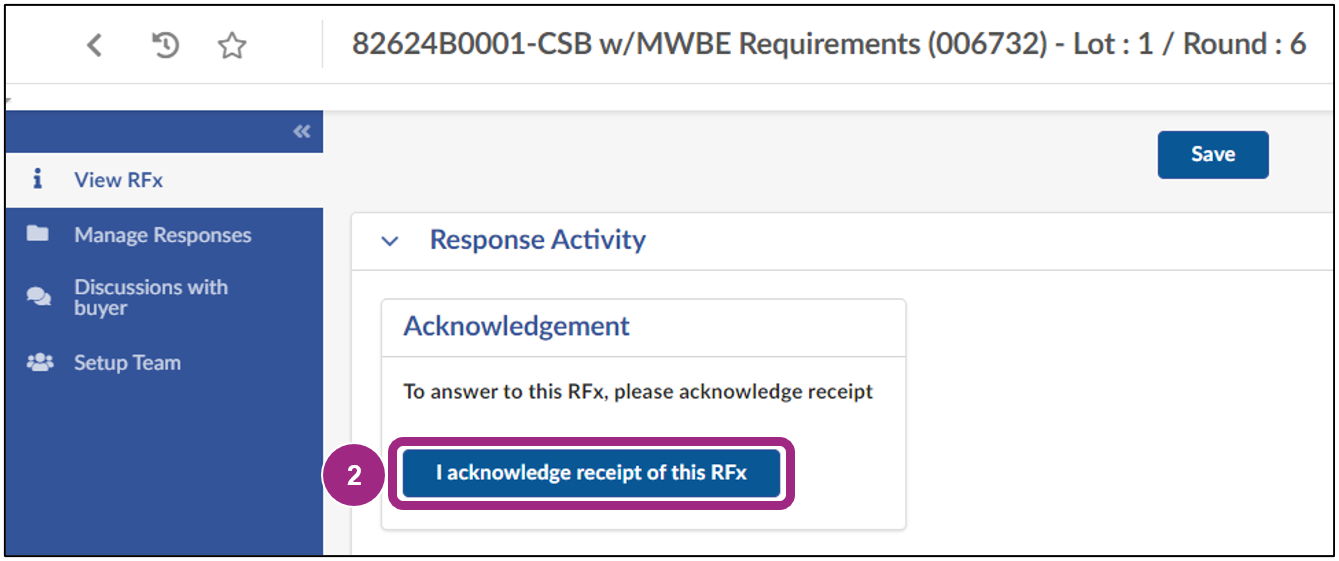
Note: If the acknowledgement buttons do not display, skip to the next step. Not all RFx require a vendor to acknowledge the RFx.
- Select WILL RESPOND: our intent is to respond to this RFx.
- Confirm the selection by clicking the green Valid button.
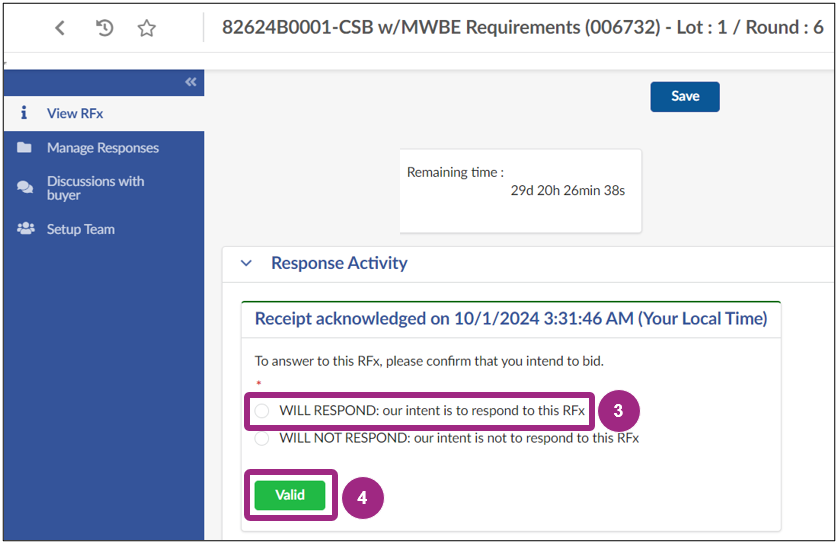
Note: If you selected WILL RESPOND and decide later that you will not submit a response, inform the Agency Contact listed in the Summary section of the RFx.
Once you selected Will Respond and clicked the green Valid button, PASSPort provides the functions and actions below.
- A countdown timer. The remaining time is displayed on every page of the RFx, tracking how much time vendors have left to submit their response before the RFx no longer accepts submissions. Please submit your response at least 48 hours in advance of the due date.
- Download all contents related to the RFx. Click the Actions button. Select this option to download a copy of the RFx so you can work on your response outside of the PASSPort.
- Duplicate Response closes your RFx response to create a copy of your response for future competition pools, or to submit information related to an RFx addendum. Multiple responses can be worked on at the same time.
- Chat with the contracting agency. Use the Discussion Forum to communicate with the contracting agency.
How to Use the Discussion Forum
Use the Discussion Forum in the RFx to communicate with the contracting agency.
The Discussion Forum benefits your team in that it:
- Makes messages visible to contacts added to your Setup Team.
- Documents all interactions.
- Available in the RFx response at all times.
Before you submit a message:
- Check the Key Dates section in the RFx to see if it lists a deadline for submitting questions to the Agency.
- For PASSort functionality questions and issues, contact the MOCS Service Desk and not the Agency.
To use the Discussion Forum:
- Click Discussion with buyer on the left navigation menu.
- Click the Compose button.
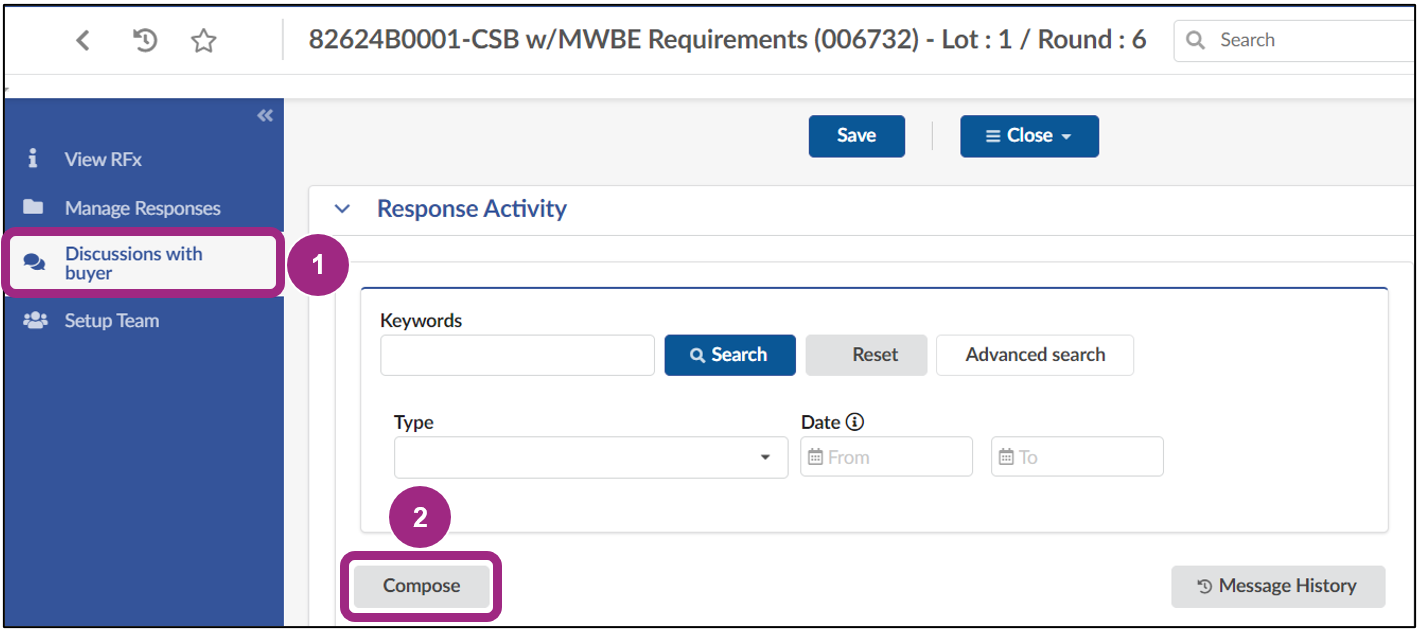
A form to compose the message appears on the right side of the page.
- In the Type drop-down field, select the appropriate message type.
- In the Subject text field, enter a brief phrase similar to the subject line of an email. For example, "Question about Scope of Work".
- In the unlabeled drop-down field below the Subject, select the intended recipient(s). Select Agency Contact to send a message to the agency.

Below the recipient drop-down field is an unlabeled text field. Click the unlabeled text field and begin typing to compose your message.
- If needed, click the Click or Drag to add files button to add an attachment.
- When you're ready to submit the message, click the Send button.
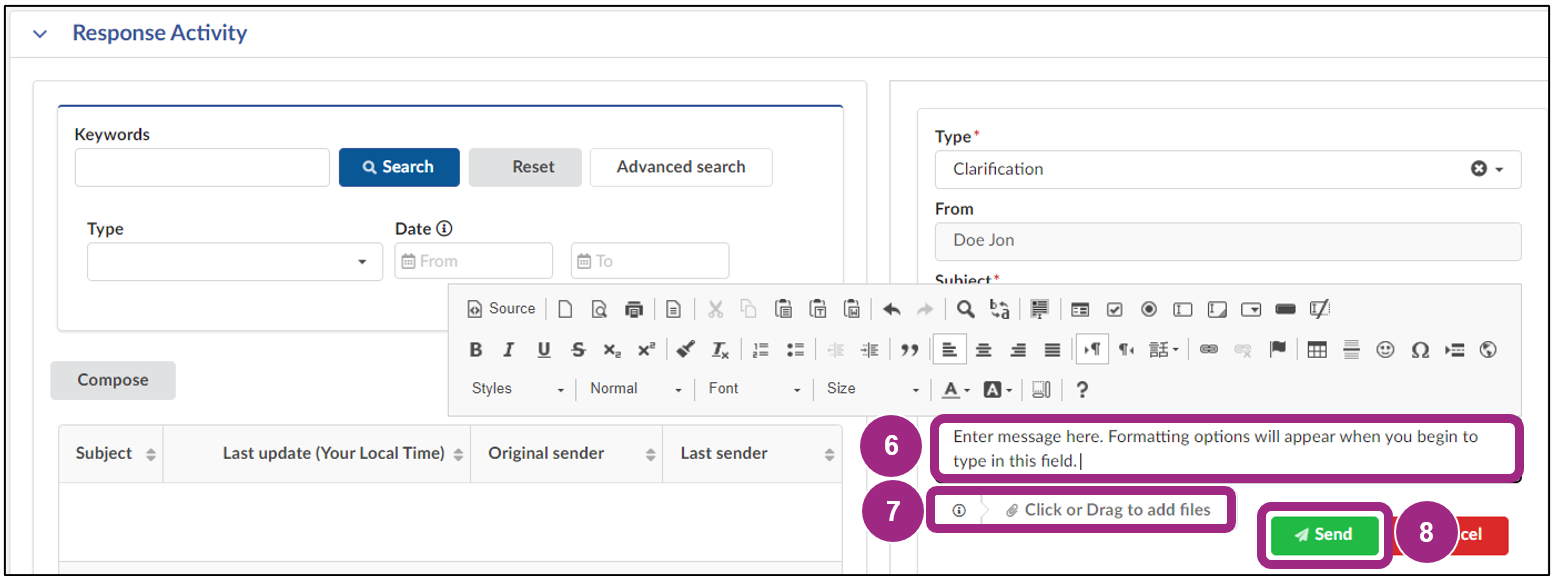
The screen refreshes, and the message will display in three locations for your convenience:
- In the Response Activity window, in a table below the Compose button.
- In the Response Activity window, to the right of the screen. From here, there are options to reply, reply all, or forward the message.
- In the Message History window, which can be viewed by clicking the Message History button. In this window, you can view all past messages.
Add RFx Contributors
Only the user who acknowledged the RFx can work on the response, making them the sole contributor.
To allow further contacts from your organization to contribute to the RFx response, the initial user can use the Setup Team tab. This allows any Vendor Admin or Procurement user role to be granted access to the RFx response.
Here's how the Vendor Admin who acknowledged the RFx can add RFx contributors:
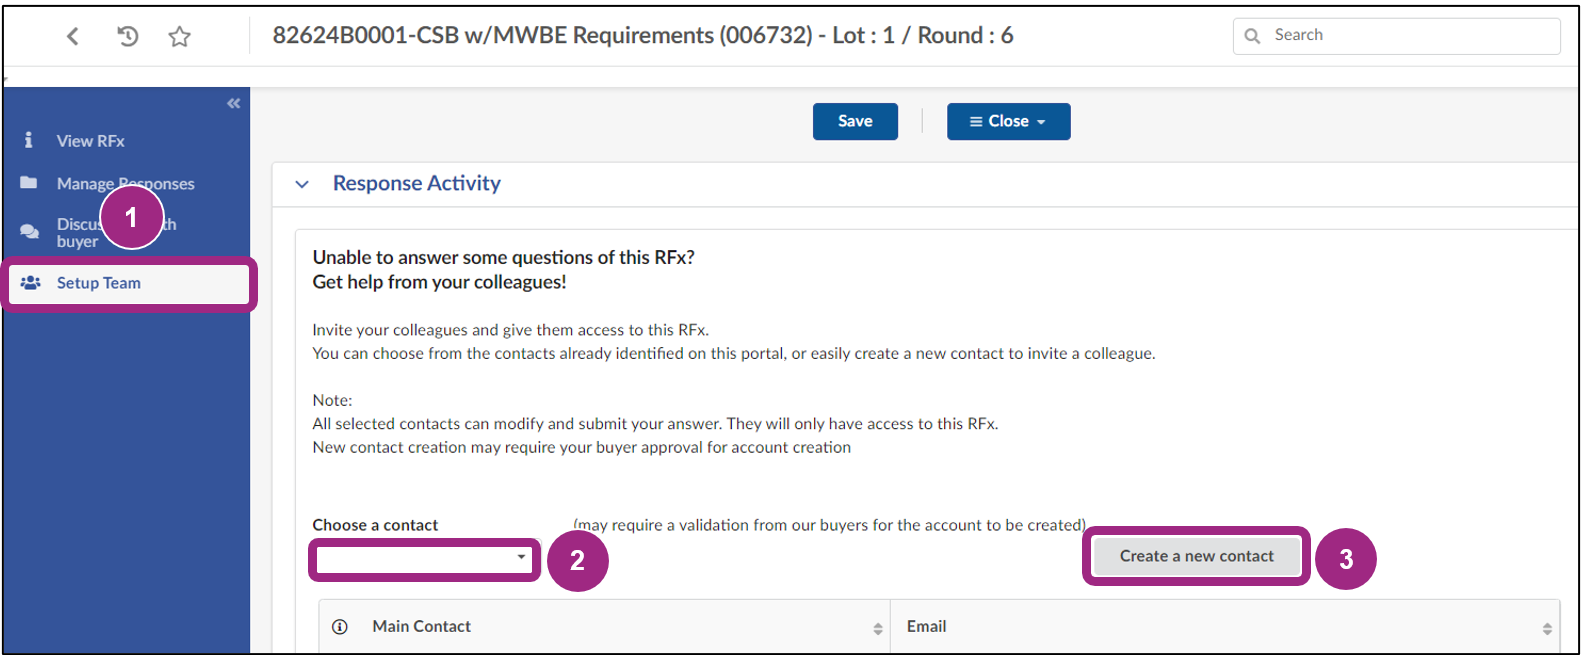
- Go to the Setup Team tab in the left navigation menu.
- To select an existing contact, select their name from the Choose a contact drop-down field.
- To create a new contact to work on this RFx response, click the Create a new contact button.
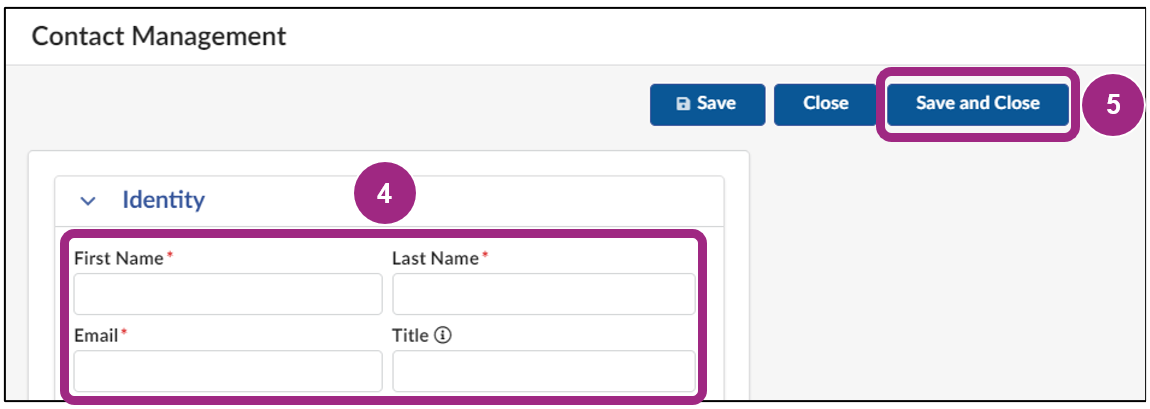
The Contact Management window opens.
- Enter the user's First Name, Last Name, and Email address. Use the same email (NYC.ID) that Contact uses to log in to PASSPort.
- Click the Save and Close button at the top of the page to add the contact to the Setup Team.
Prepare Your RFx Response
When the intent to respond is affirmed, PASSPort automatically creates a draft response for the vendor in the Manage Responses tab. Now it's time to prepare your RFx response!
Important: Only users who have been added to the Setup Team tab (by the Vendor Admin who acknowledged the RFx) can work on the RFx response.
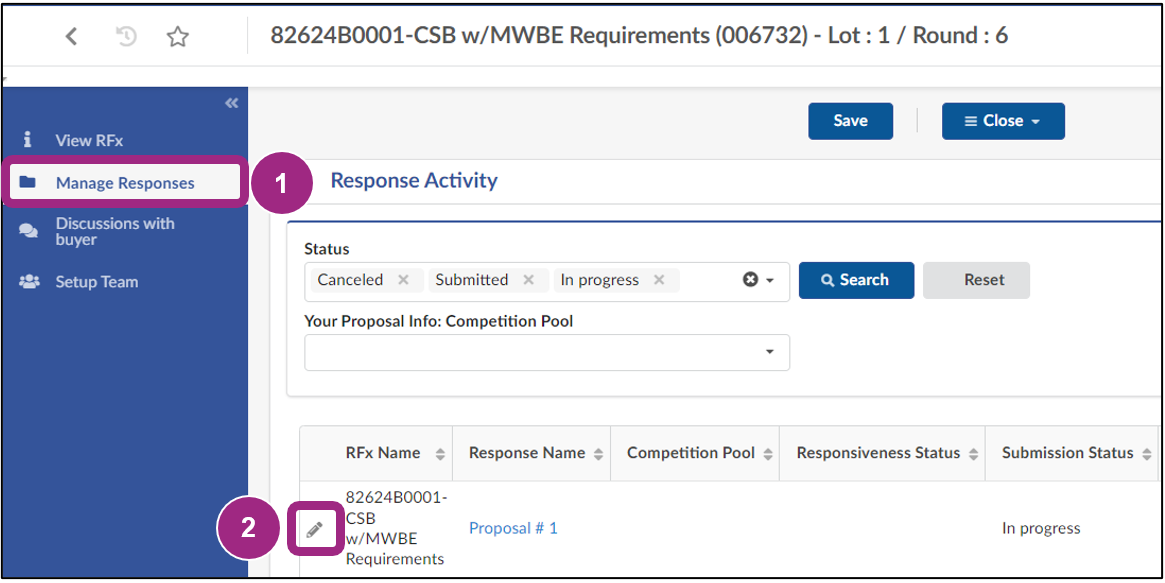
- Go to the Manage Responses tab in the left navigation menu. The in progress RFx response is listed in the Response Activity section.
- Click the pencil icon to open the draft response.
The Your Proposal Info tab of your RFx response will display.
- Edit the Response Label field to change the system generated response name.
- Enter a description in the Description field, if necessary.
- Select a competition pool in the Your Proposal Info: Competition Pool drop-down field.
All RFx have at least one competition pool. An agency may choose to segment a procurement into multiple competition pools based on the procurement's specifications.
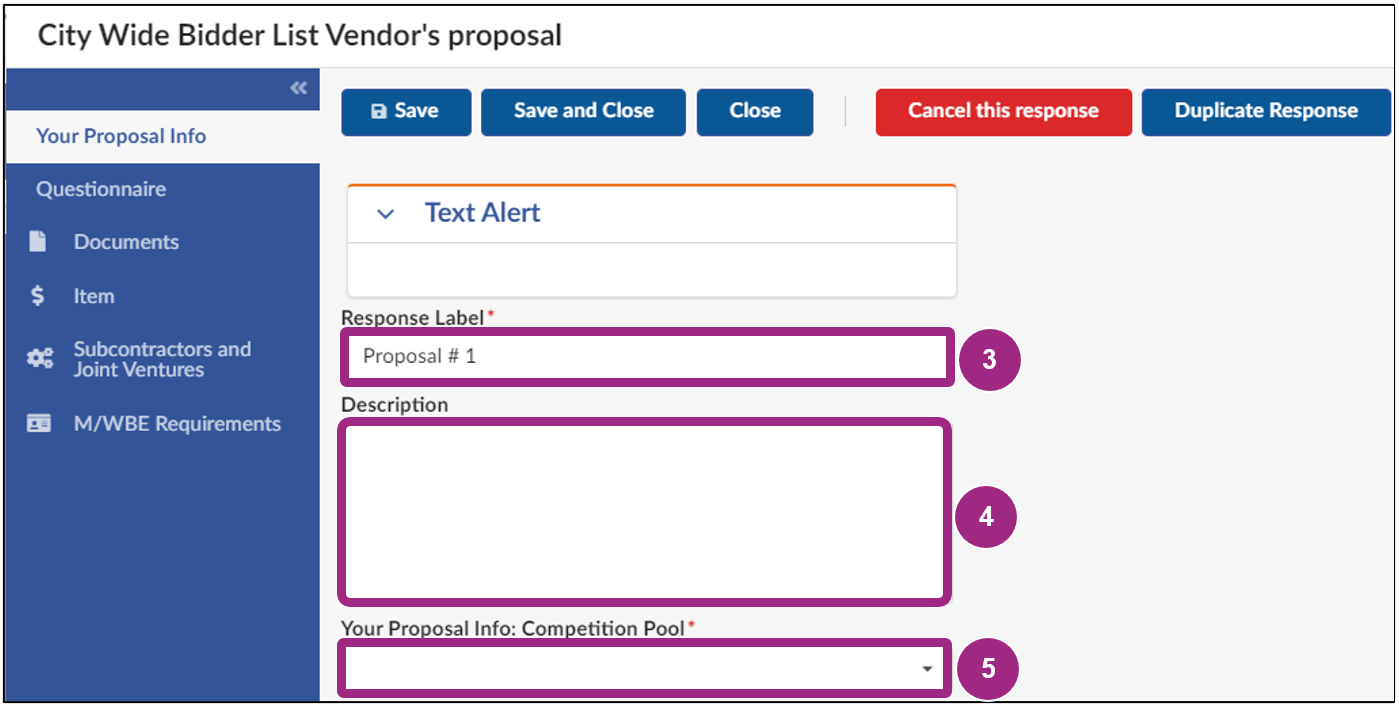
Click the Save button near the top of the page when all required fields are completed.

A note regarding the RFx response action buttons:
- If necessary, use the Cancel this response button. Once an RFx response is canceled, it cannot be recovered.
- Learn when and how to use the Duplicate Response button - refer to Duplicate an RFx Response.
- A Create New Response button will be available for you to initiate the new proposal. This button will only become available after a first response has been submitted.
Now that the RFx response has a title and description, we recommend you complete the RFx response tabs in the following order:
- Questionnaire tab
- Documents tab
- Item tab
- LL34 Compliance tab
- Subcontractors and Joint Ventures tab
- MWBE Requirements tab
Note: There might be more than one Questionnaire tab in an RFx (e.g., General Envelope Questionnaire, Technical Envelope Questionnaire, and Financial Envelope Questionnaire).
Complete the Questionnaire Tab
This tab displays questions the agency would like you to respond to. The questions are written by the agency to collect vendors' answers which will be used to evaluate their RFx response(s) during the Evaluation and Award phase.
Note: There may be more than one Questionnaire tab depending on the procurement method and the agency's questions (e.g., General Envelope Questionnaire, Technical Envelope Questionnaire, and Financial Envelope Questionnaire). Questions may be scored or used for informational and/or responsiveness purposes.
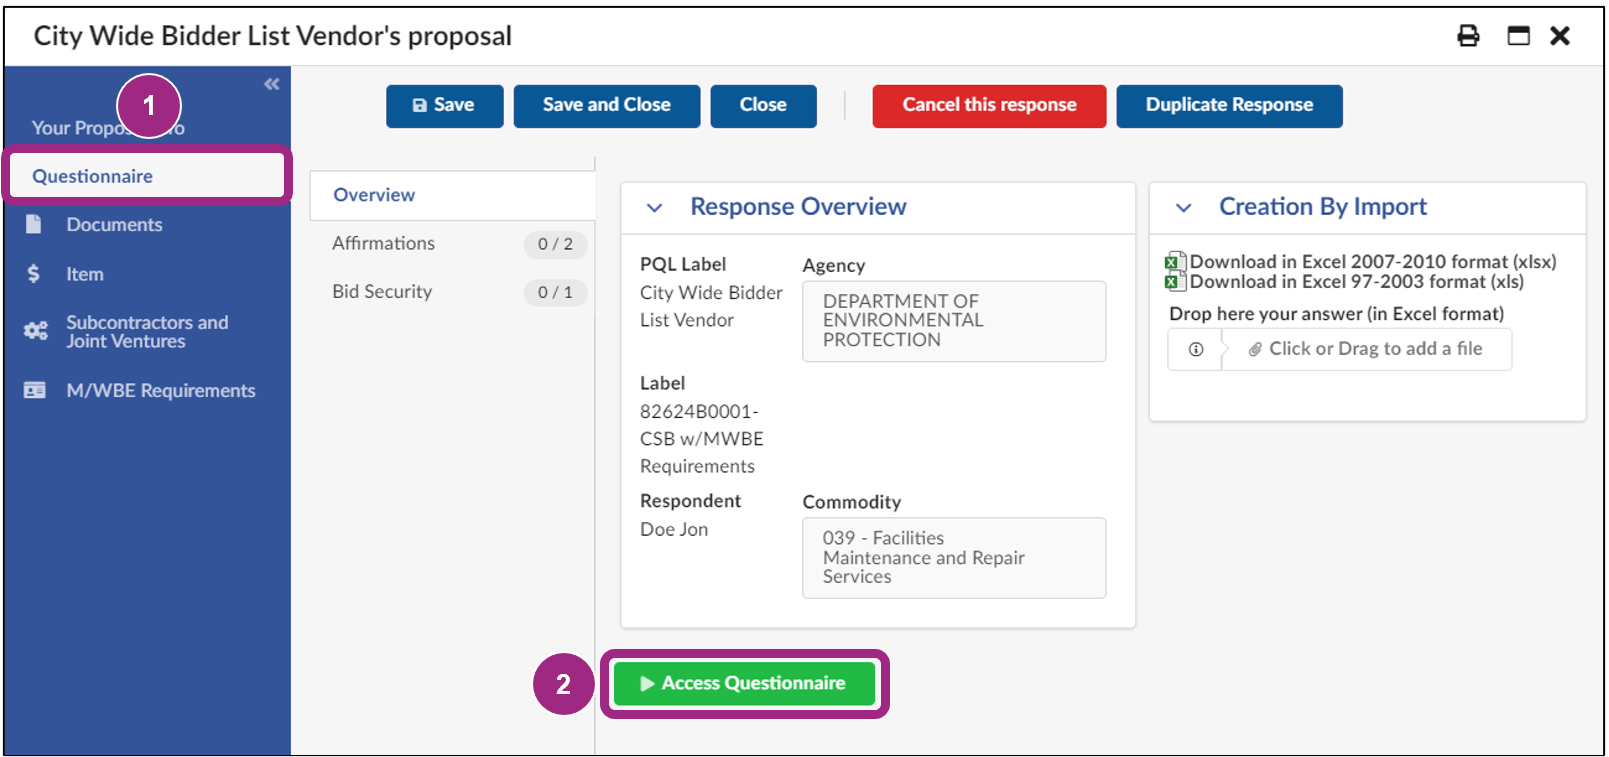
- Go to the Questionnaire tab in the left navigation menu.
- Click the green Access Questionnaire button.
- Answer the questions using the dropdowns or fields provided. Required fields can be identified by a red asterisk (*).
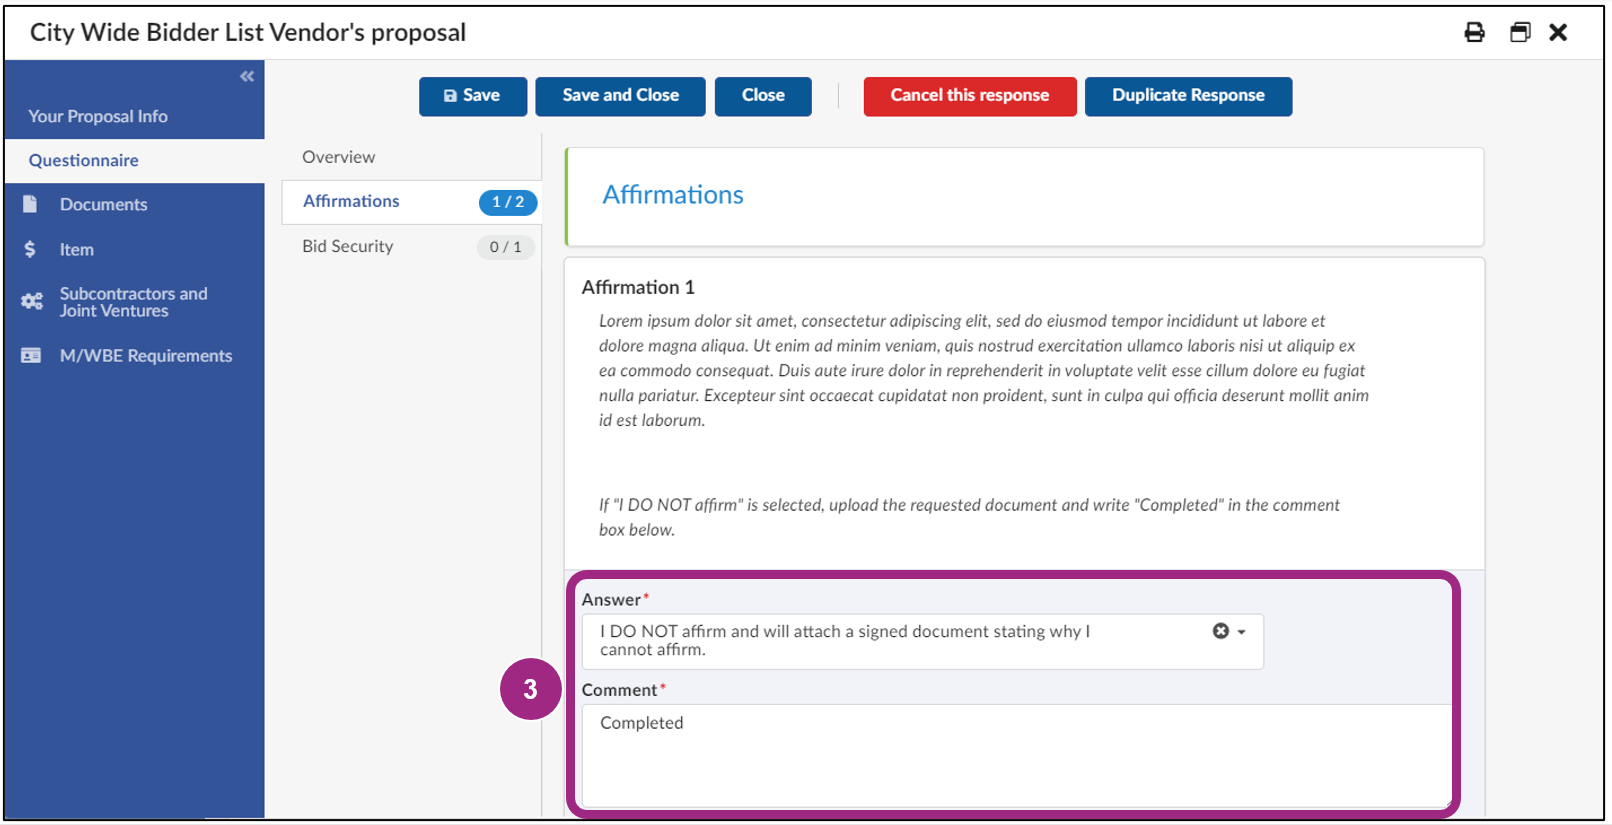
Note: Agencies may structure questions in the form of requests for documents. Documents cannot be uploaded directly to the Questionnaire. However, vendors can share requested documents with the agency by adding them to the Documents tab of the RFx response. Learn more about RFx document management in the Documents tab section of this guide.
- Click the Save button after all sections of the questionnaire are completed.

Complete the Documents Tab
Agencies can share documents with vendors in the Documents section of the View RFx tab (not to be confused with the Documents tab in the RFx response). Likewise, vendors can share requested documents with the agency by adding them to the Documents tab of the RFx response.
How to Name Documents:
To help streamline the RFx response process, MOCS recommends vendors implement naming conventions for the files they upload in the Documents tab of the RFx.
File names should include the following information:
- The section number
- The question number
- The document name
- Your organization's name
For example, if the agency requested that you upload an organizational chart in Section 2, Question 3 of the Questionnaire, name the document "S2Q3_OrgChart_[YourLegalBusinessName]". This naming convention will help staff performing responsiveness checks ensure that all requested documents are accounted for.
Note: Agencies will adopt similar naming conventions for files they intend to share with and request from vendors. This will assist with organization and allow both agencies and vendors to easily reference and locate documents.
How to View Documents:
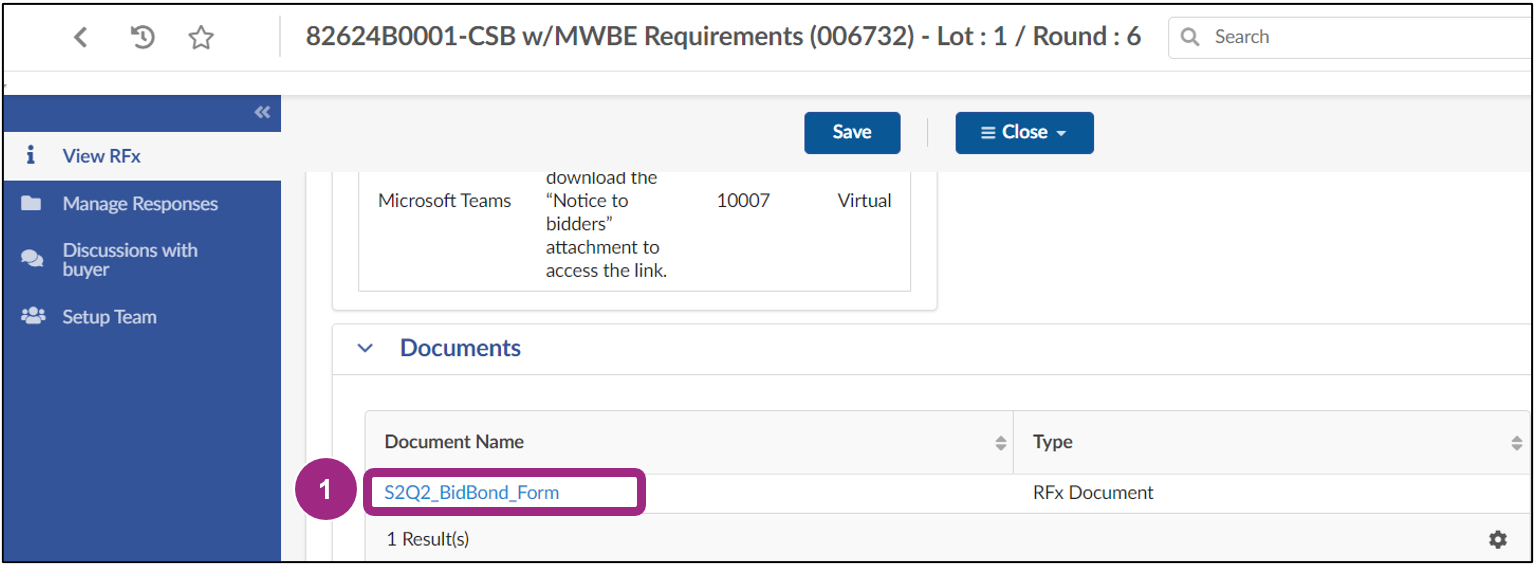
The Documents section in the View RFx tab (not to be confused with the Documents tab in the RFx response) houses supplemental material provided by the contracting agency.
In some cases, agencies may request that vendors download a blank form or template listed in this section and upload the completed document in the Documents tab of the RFx response.
- Click on the hyperlinked Document Name to download the document to your device.
How to Add Documents to Your RFx Response:
- Go to the Documents tab in the left navigation menu of your RFx response. In the Response Documents section, there is a table that lists all the documents requested by the agency. The table includes information about the document, such as the:
- Document Type
- Required Type: Indicates if the document is Optional or Required.
- Agency Label: May include a description of the document requested. If the document is related to a question in the Questionnaire tab, that information will be included here.
- Status: Indicates if the document has not yet been added (Pending Upload)
Note: If the RFx is a Double or Triple Envelope, 2 or 3 tables will appear in this tab.
- Click the Manage Documents button to begin adding documents to your response.
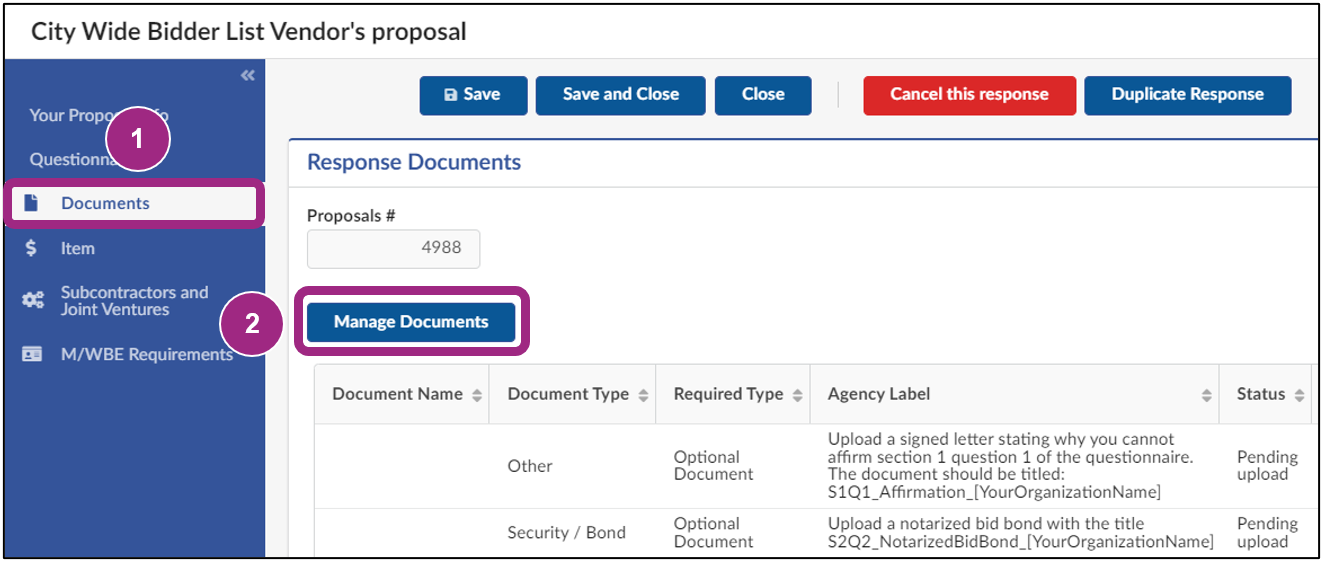
The Manage Documents window opens. Documents are sorted into two sections: Required and Optional.
For detailed instructions on how to add documents, see Upload or Link Documents to a Task. After successfully adding the requested documents, the document Status updates to Uploaded.
- Click the Save button near the top of page.

If needed, return to the Questionnaire Tab to complete any pending questions.
Complete the Item Tab
Here, the agency identifies the required items for the contract. The Item tab can be completed directly in the system, or it can be downloaded, completed, and uploaded in Excel format. PASSPort automatically populates the responses provided.
Note: PASSPort Vault functionality is not connected to the Item tab. Therefore, vendors must upload documents from their computer to this tab.

- To manually complete the Item tab, complete the required fields marked with a red asterisk (*). If there are multiple subtabs, be sure to complete the fields in each subtab.
- Click the Save button near the top of the page.
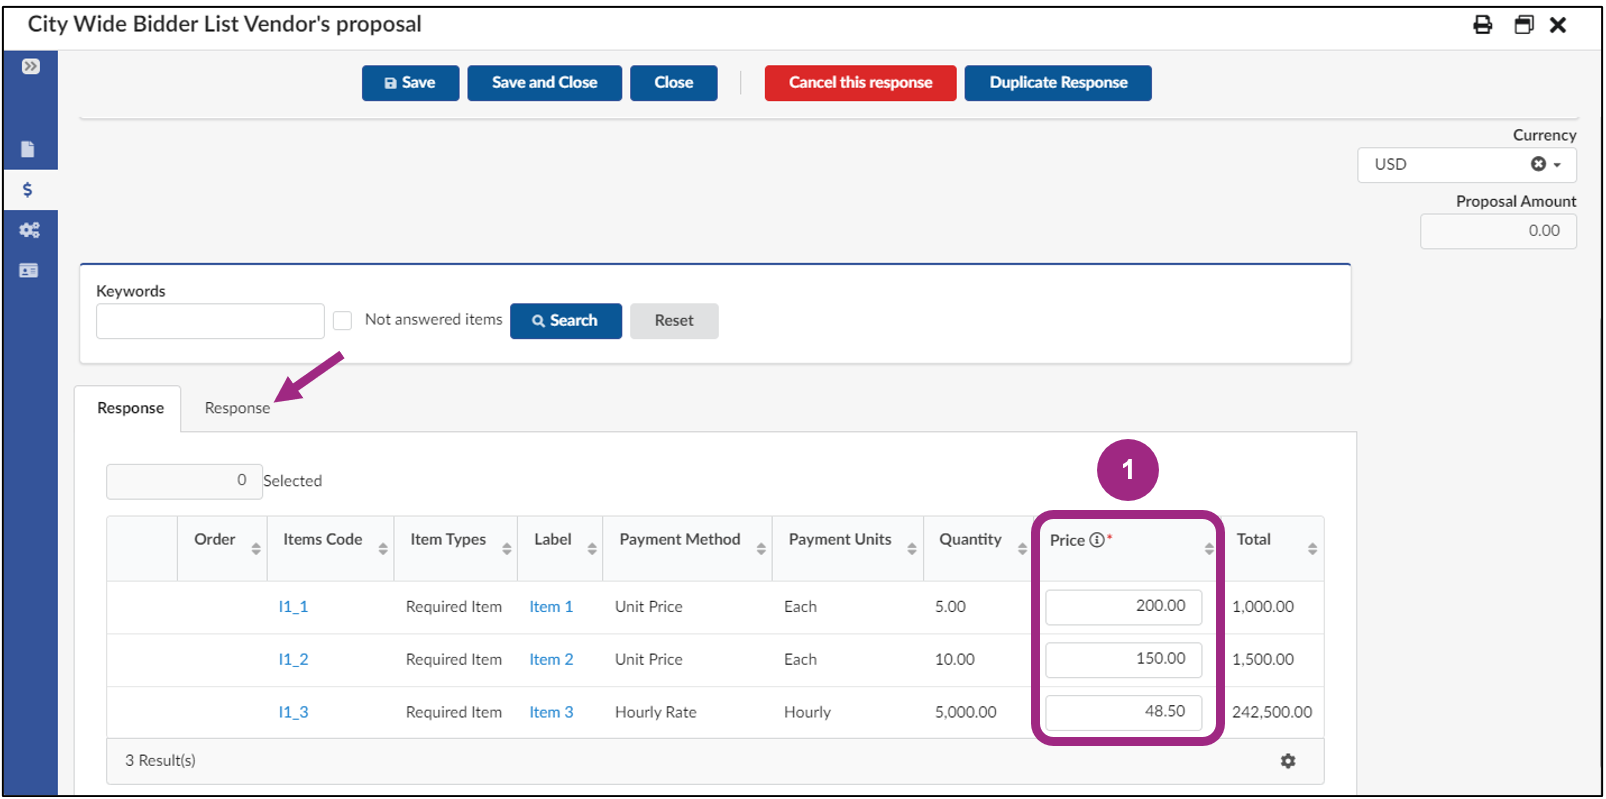

The page refreshes, and the Proposal Amount field to the right of the screen updates and displays the total amount of all fields in the Item table.
Complete the LL34 Compliance Tab
Although the Subcontractors and Joint Ventures tab appears next in the RFx response menu, the LL34 Compliance tab must be completed first.
The LL34 Compliance tab allows you to complete all Doing Business Data information within PASSPort. Local Law 34 of 2007 (LL 34) is New York City's campaign finance law that limits municipal campaign contributions from principal officers, owners, and senior managers of entities doing business with the City.
An organization is required to submit the information requested on this tab each time it enters into a transaction considered a business dealing with the City, regardless of whether the organization or the people associated with it make or intend to make campaign contributions.
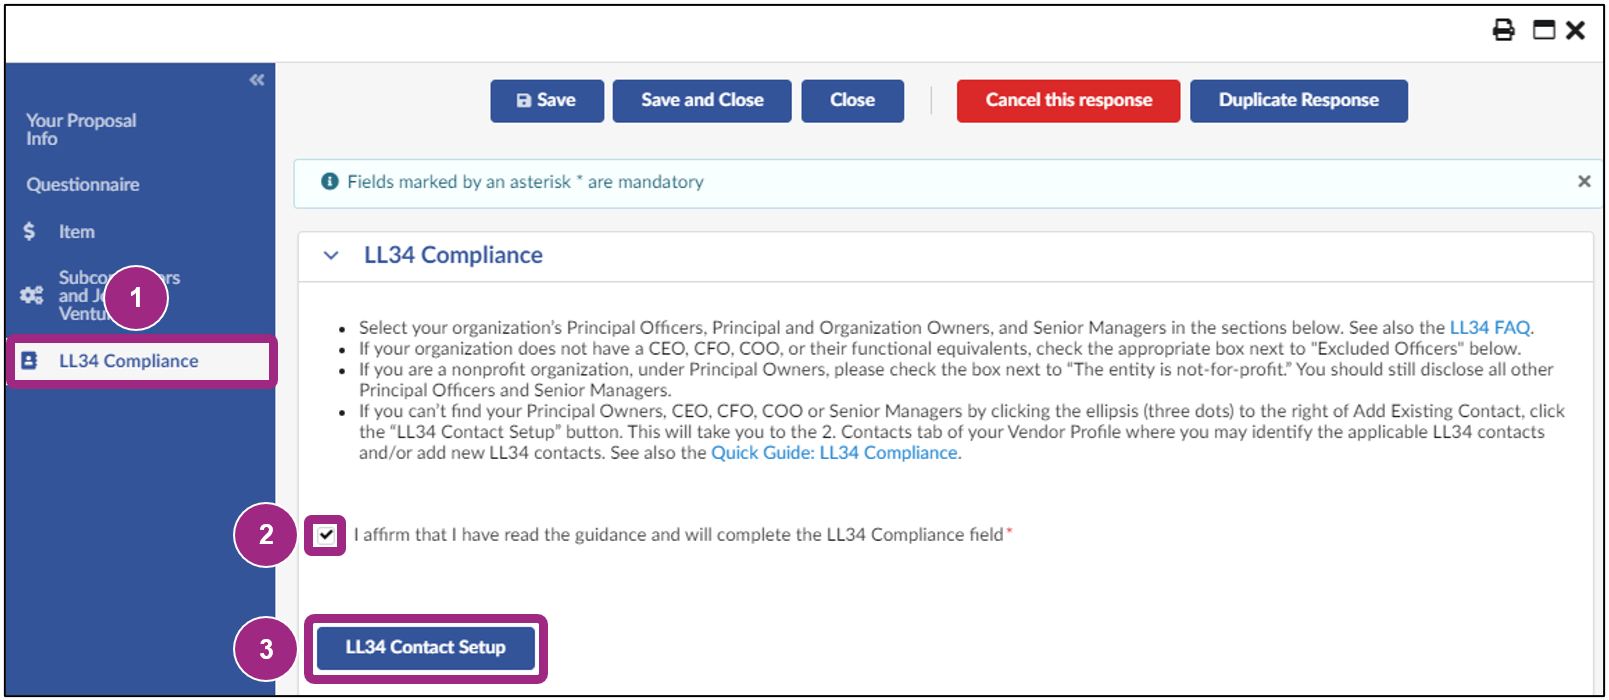
- Go to the LL34 Compliance tab in the left navigation menu.
- Read the LL34 compliance guidance and click the checkbox that affirms you have read the guidance and will complete the LL34 Compliance field.
- If you have not done so already, click the LL34 Contact Setup button to identify LL34 contacts in your vendor profile. See the compliance guidance for instructions.
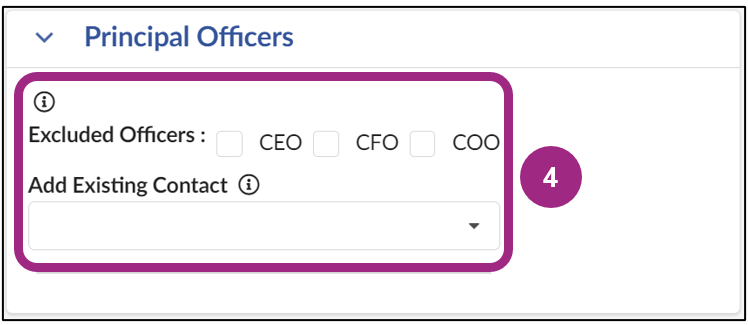
- In the Principal Officers section, select a Principal Officer in the Add Existing Contact drop-down field. Multiple selections can be made. If your organization does not have a CEO, CFO, COO, or the equivalent such as President, Treasurer, etc., check the applicable box for Excluded Officers.
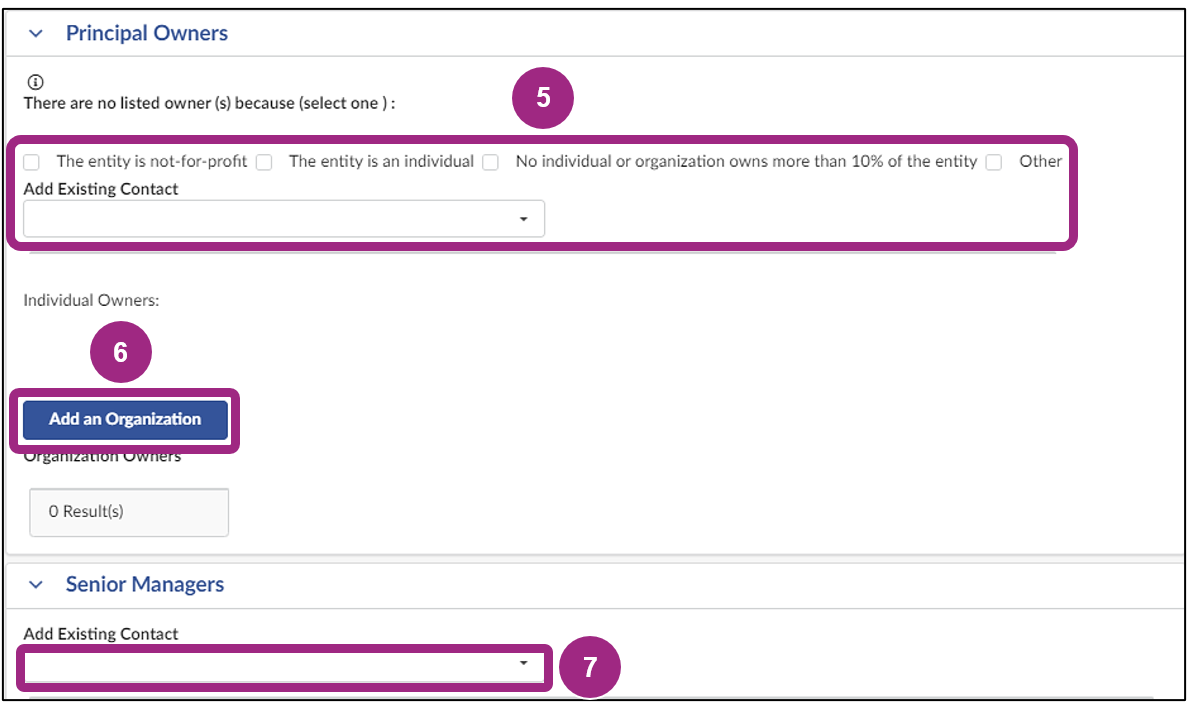
- In the Principal Owners section, select a Principal Owner in the Add Existing Contact drop-down field. Multiple selections can be made. If there are no listed owner(s), choose the applicable checkbox:
- The entity is not-for-profit
- The entity is an individual
- No individual or organization owns more than 10% of the entity
- Other
- If the organization is owned by another, click the Add an Organization button. The Add Organization window opens, and the Organization Name can be entered on that screen.
- In the Senior Managers section, select a Senior Manager in the Add Existing Contact drop-down field. Multiple selections can be made. Note: At least one Senior Manager must be selected in this field.
- Click the Save button near the top of the page.

Complete the Subcontractors and Joint Ventures Tab
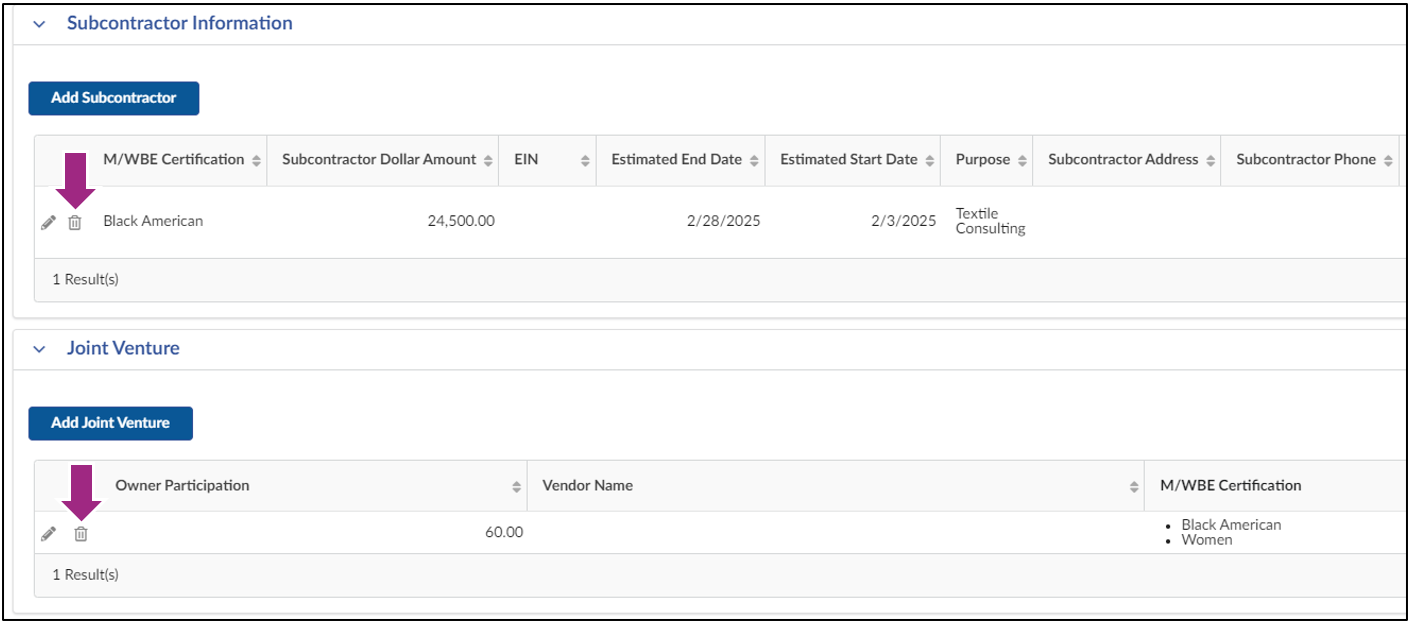
The Subcontractors and Joint Ventures tab is where you identify any applicable joint ventures or M/WBE certified subcontractors in connection with the RFx and enter corresponding information, if applicable.
Subcontractors and Joint Ventures identified in this tab will count towards the M/WBE Participation Goals, found in this tab and the M/WBE Requirements tab, if they carry an applicable M/WBE certification.
- Go to the Subcontractors and Joint Ventures tab in the left navigation.
- Read the instructions in the M/WBE Requirements section.
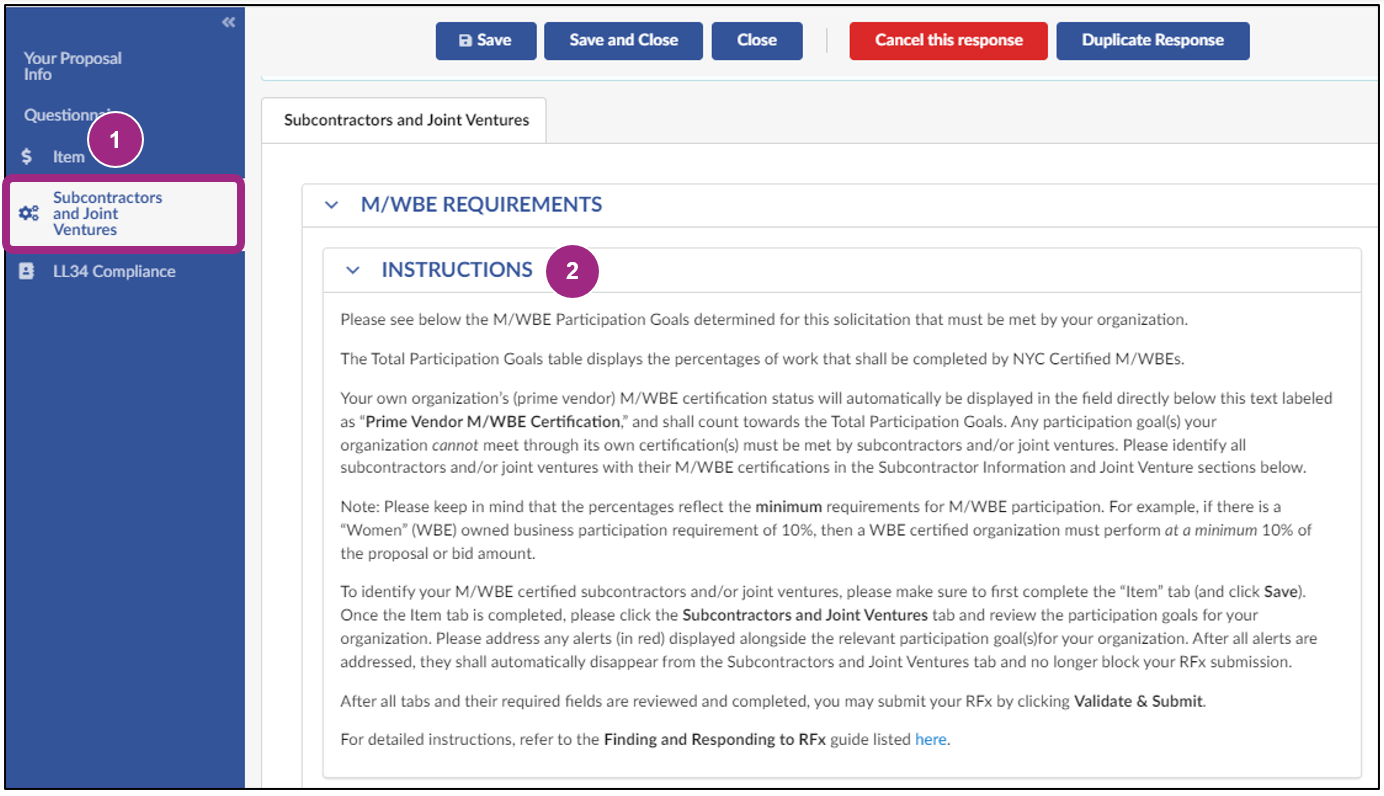
Step 1: Review the M/WBE Participation Goals
If the RFx has M/WBE Participation Goals, your own organization's M/WBE certification(s) count towards the Total Participation Goals and automatically display in the Prime Vendor M/WBE Certification field directly below the Instructions.
Any M/WBE participation goals that remain unmet are highlighted with orange text alerts displaying to the right of the M/WBE Participation Goals table.
- In this example, the Prime Vendor does not have any M/WBE Certifications displaying (the field is blank) and thus still needs to meet the requirements as indicated.
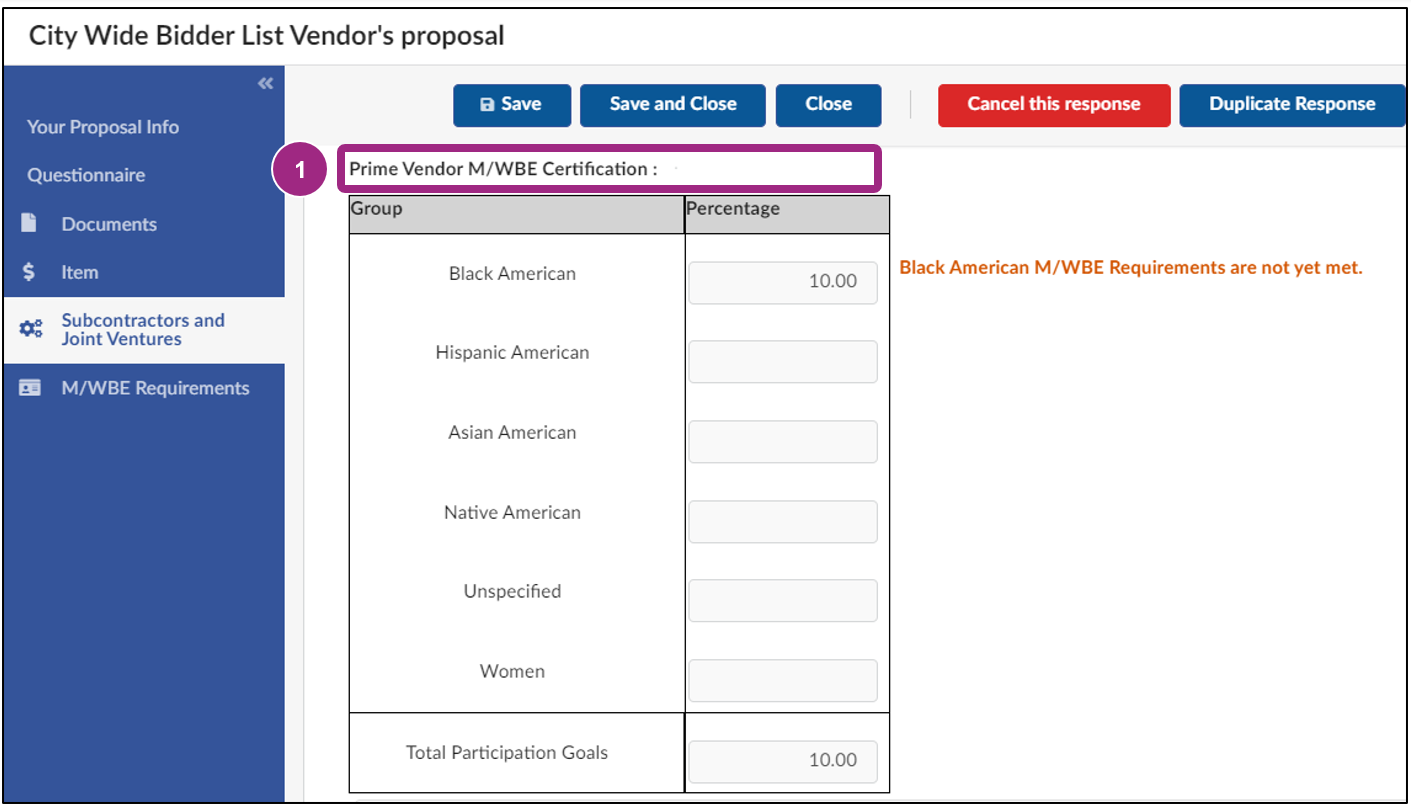
Note: Any participation goal(s) an organization cannot meet through its own certification(s) must be met by identifying subcontractors and/or joint ventures with the required certifications.
Step 2: Add a M/WBE Certified Subcontractor(s)
- Click the Add Subcontractor button in the Subcontractor Information section.

Then, follow the steps in the section that applies to your situation:
- Case: I have identified the subcontractor and they are Filed in PASSPort
- Case: I have not identified the subcontractor and/or they are not Filed in PASSPort
Case: I have identified the subcontractor and they are Filed in PASSPort
- In the Subcontract Information section, complete the required fields marked by a red asterisk (*).
Note: The Subcontractor Dollar Amount value is calculated against the Proposal Amount in the Item tab to determine the percentage towards the M/WBE Goal Participation for this RFx.
- In the Vendor Information section, select the name of the vendor in the Select PASSPort Vendor drop-down field.
- Click the Save button near the top of the page.
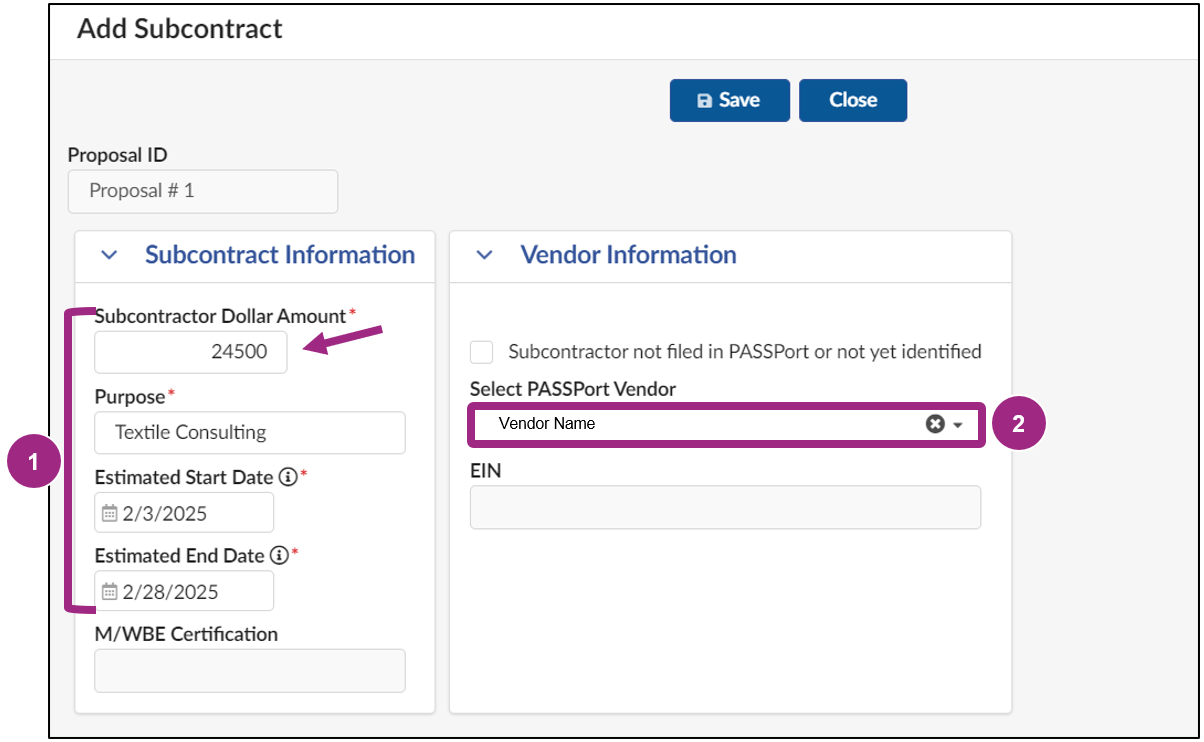

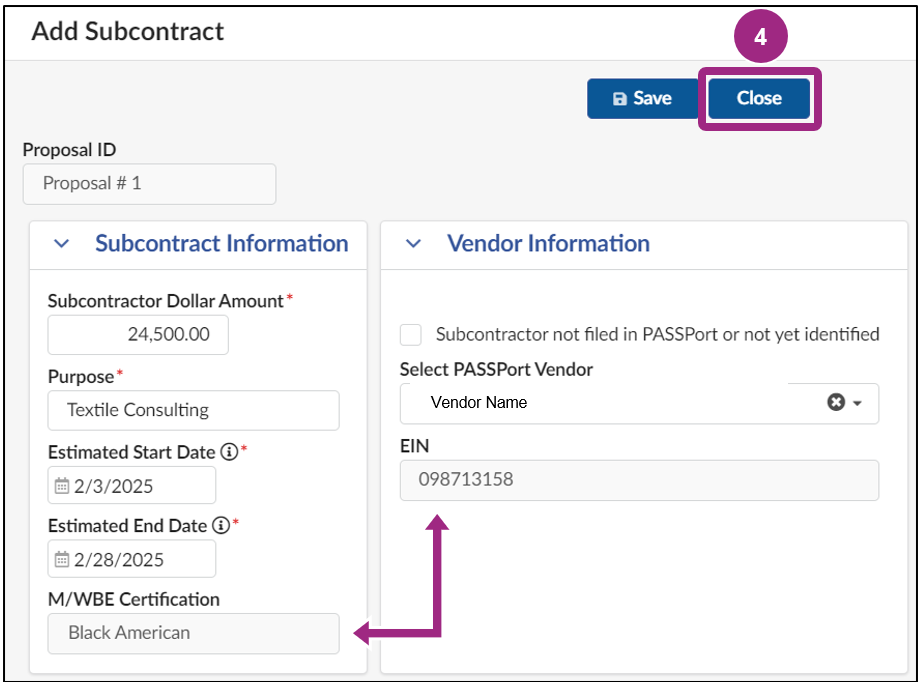
The organization's M/WBE Certification and EIN auto-populate in the relevant fields.
- Click the Close button to return to the Subcontractors and Joint Ventures tab.
Case: I have not identified the subcontractor and/or they are not Filed in PASSPort
In this case, vendors will click the Subcontractor not filed in PASSPort or not yet identified checkbox to manually enter subcontractor information.
There are three scenarios in which vendors would click the Subcontractor not filed in PASSPort or not yet identified checkbox:
- Scenario 1: The subcontractor has a PASSPort account but is not Filed.
- Scenario 2: The subcontractor does not have a PASSPort account.
- Scenario 3: A specific subcontractor has not yet been identified, and this serves as a placeholder to meet a specific participation goal.
Follow the steps below to manually enter subcontractor information:
- In the Subcontract Information section, complete the required fields marked by a red asterisk (*).
- In the Vendor Information section, click the Subcontractor not filed in PASSPort or not yet identified checkbox and complete the following fields:
- EIN
- Subcontractor Name
- Subcontractor Address
- Subcontractor Phone
- M/WBE Certification (now editable in the Subcontract Information section)
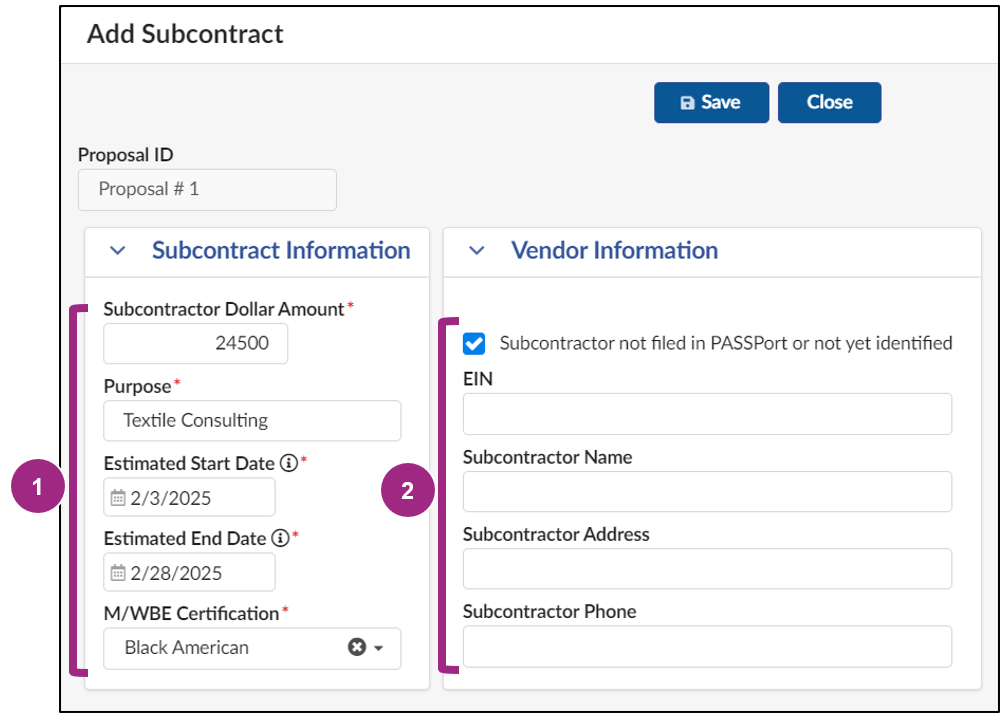
- Click Save.
- Click Close to return to the Subcontractors and Joint Ventures tab.

Step 3: Add a Joint Venture
If applicable, add a Joint Venture.
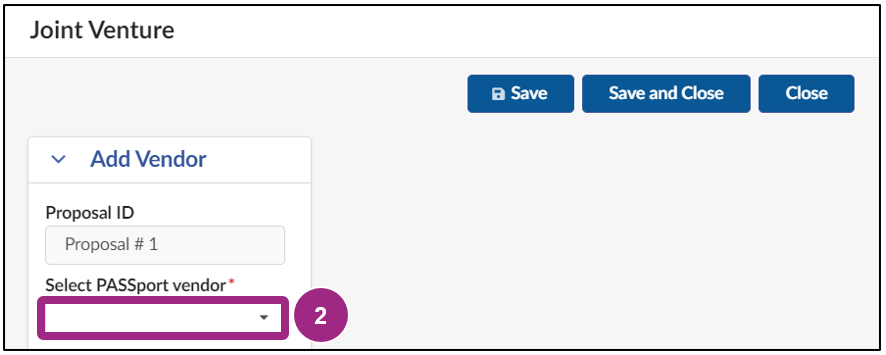
- Click the Add Joint Venture button in the Joint Venture section.
- Select the vendor's name in the Select PASSPort Vendor drop-down field. The organization must be filed in PASSPort.
- Click the Save button near the top of the page.
- Complete the Ownership % and M/WBE Certification fields.
- Click the Save button near the top of the page.


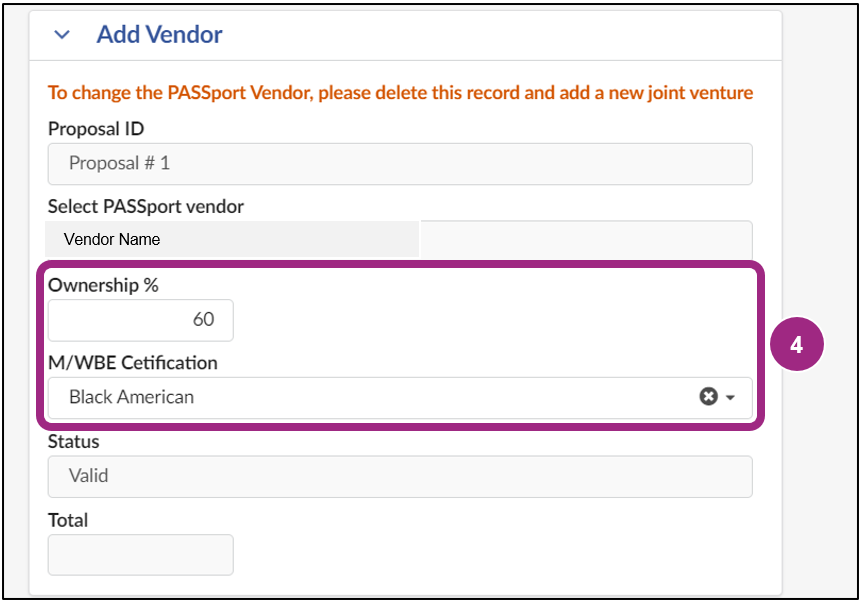

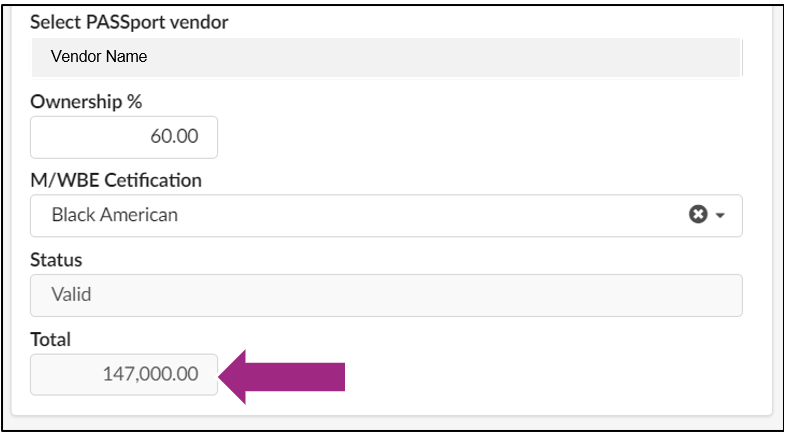
PASSPort automatically populates the Total amount covered by the joint venture based on the Ownership % entered compared to the Proposal Amount (see Item tab).
In this example, the joint venture partner entity selected has 60% ownership which calculates here to equal $147,000 in total of the full $245,000 Proposal Amount.
- Once participation goals are met and all alerts are addressed, the alerts no longer display.
Note: For vendors with multiple M/WBE certifications, please note that only one certification can be entered at a time. To add an additional certification, please repeat the Add a Subcontractor or Add a Joint Venture steps to meet additional participation goals.
If any information entered requires updating in an added Subcontractor or Joint Venture record, delete the record by clicking the trash icon and re-add it with the updated information.
The M/WBE Requirements Tab (Read-Only)
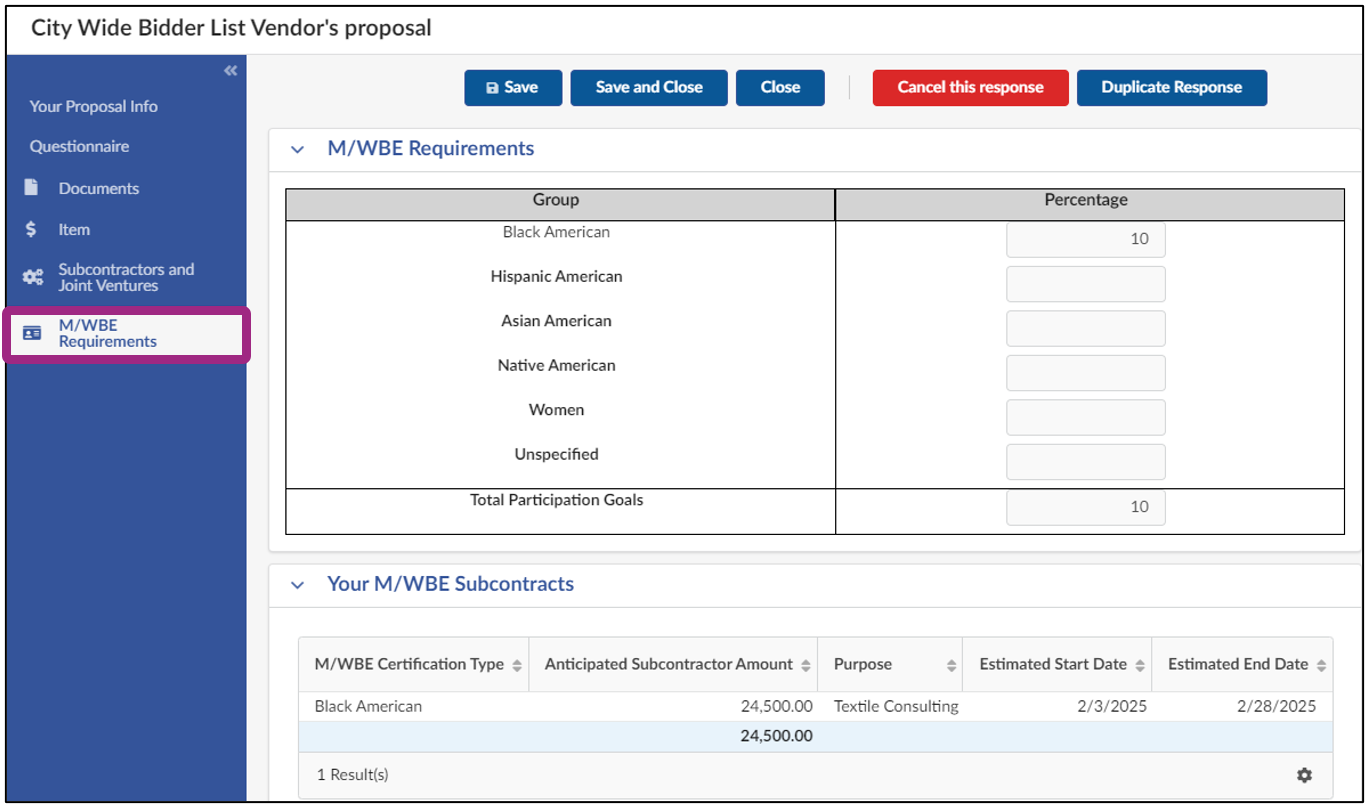
The M/WBE Requirements tab appears for procurements with an M/WBE goal and ensures compliance with M/WBE regulations. For more details on the M/WBE program related to this solicitation, please refer to the Local Law 1 Notice to All Prospective Contractors.
This tab is read-only and does not require any data entry.
If any information in the M/WBE Requirements tab is incorrect, please update it through the Subcontractors and Joint Ventures tab as needed.
How To Submit a Request for Waiver of M/WBE Participation Requirement
If necessary, a waiver of the M/WBE participation requirement can be submitted via the Discussion Forum of the RFx.
A copy of the Schedule B form can be found in the Documents section of the RFx. The Vendor Contract History Excel template is linked in Part 3 of the Schedule B form.
Follow these steps to submit a Waiver Request to the Agency:
- Click Save and Close to close out of the proposal window.
- Go to the View RFx tab.
- Scroll down to the Documents section, download the Schedule B form, and complete Part 3.
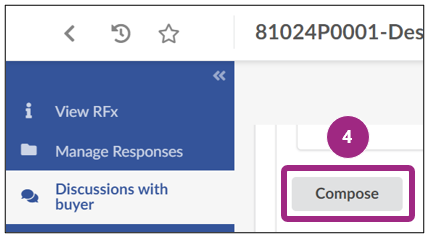
- Go to the Discussion with Buyer tab and click the Compose button to start a draft message to the agency.
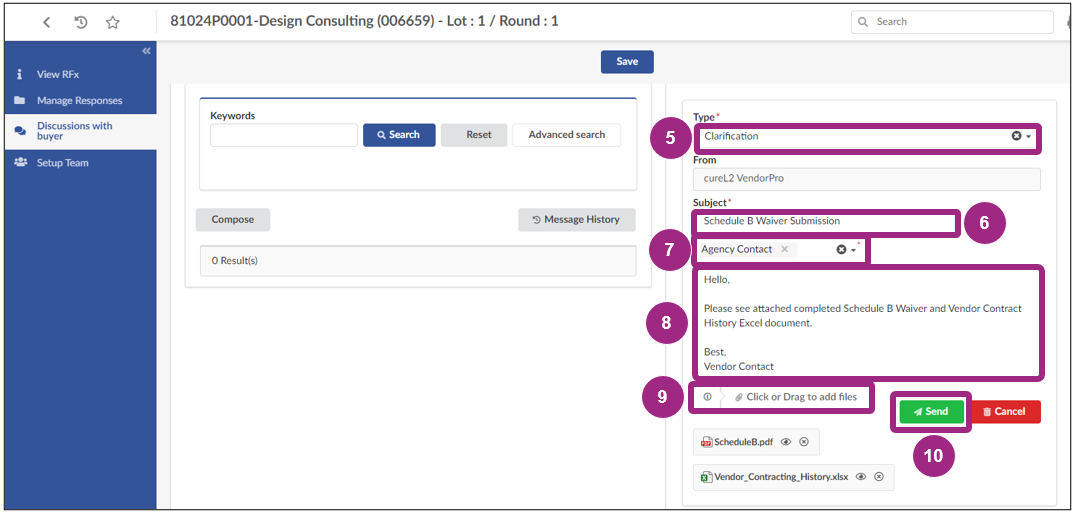
- Select Clarification in the Type drop-down field.
- Type a subject in the Subject field such as "Schedule B Waiver Submission".
- Select Agency Contact from the unlabeled drop-down field.
- Type your message in the unlabeled text field.
- Click the Click or Drag to add files button and upload the completed Schedule B - Part 3 form and the completed Vendor Contract History Excel document.
- Click the Send button to submit your message and its attachments to the Agency Contact.


The agency will review the waiver and the result of the agency's waiver determination will be reflected in PASSPort in both the M/WBE Requirements tab and the Subcontractor and Joint Ventures tab of your RFx response. For additional information, see Local Law 1 Notice to All Prospective Contractors.
Submit Your RFx Response
After your response is filled out and all required information has been provided, the response can be submitted.
- Click the green Validate & Submit button near the top of the page.

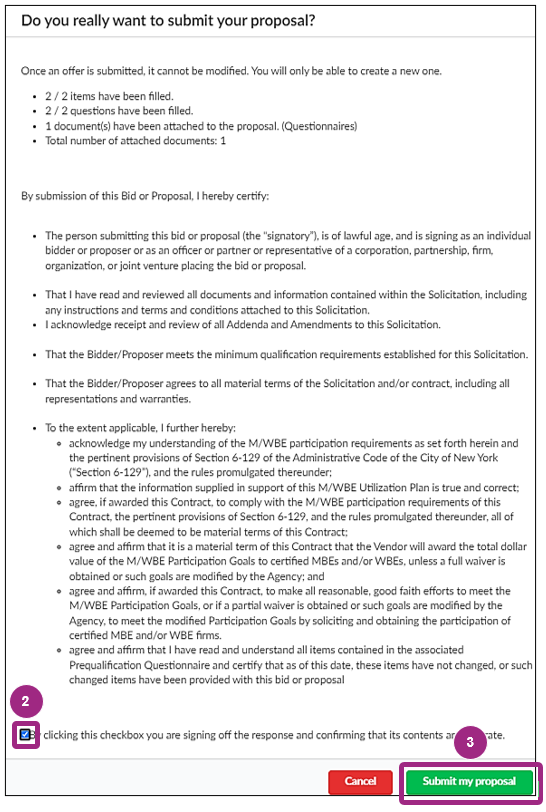
A Do you really want to submit your proposal? pop-up window opens.
- Read the statement carefully then click the checkbox at the bottom left of the window to sign off on the response and confirm that the response content is accurate upon submission.
Important: After you submit your proposal, you will not be able to retract or modify your response. Please be sure to review your work carefully before submitting!
- Click the Submit my proposal button in the bottom right corner of the window.
Are you receiving a blocking alert when trying to submit your response? Here are some common reasons for this issue:
- Incomplete Required Fields: Ensure all required fields are filled out by carefully reviewing each tab in the RFx.
- Incorrectly Completed Fields: Ensure the LL34 Compliance tab has been completed correctly.
- Competition Pool Not Selected: At least one Competition Pool must be selected in the Your Proposal Info tab.
- RFx Closed by the Agency: The RFx may have been closed by the agency and is no longer accepting submissions. Remember to submit responses at least 48 hours before the due date.
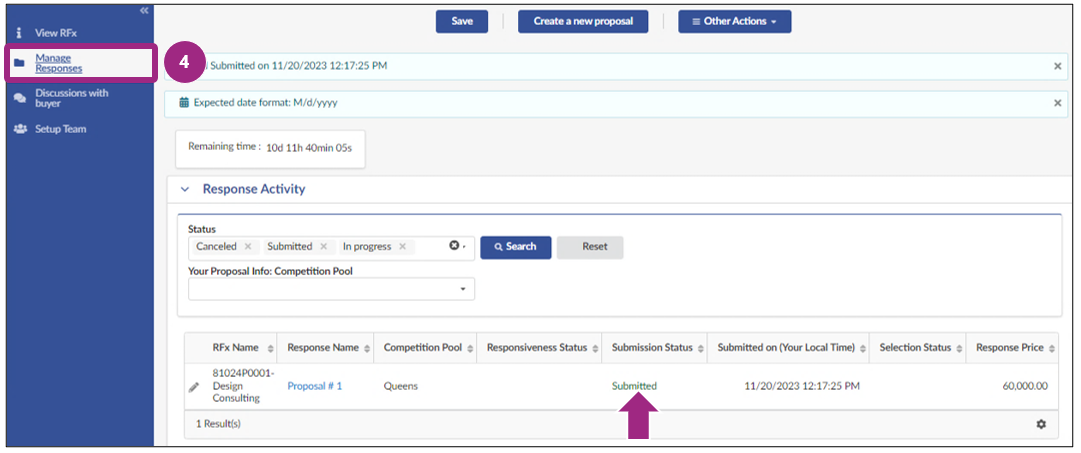
The screen will refresh, displaying a system message confirming that the response has been successfully submitted.

- Take a moment to navigate to the Manage Responses tab and confirm that the Submission Status updated from In Progress to Submitted.
Congratulations! You successfully submitted the RFx response!
Need to edit a submitted response?
- For RFx in Released status:
- Use the Duplicate Response button to create a copy of your submitted response. Edit as needed and submit. Then, click into the incorrect response (originally submitted response) and click the red button to withdraw your first response.
- For RFx in Responses Received status:
- The Agency no longer accepts responses. The vendor cannot revise or retract their submitted responses.
Duplicate an RFx Response
Once the initial response is submitted, vendors have the option to duplicate their RFx response.
This option creates a copy of the response that can be edited and used for subsequent competition pools, or to submit updated information related to an RFx addendum.
Responses can be worked on simultaneously by contacts listed in the Setup Team.
To proceed with this option, follow these steps:
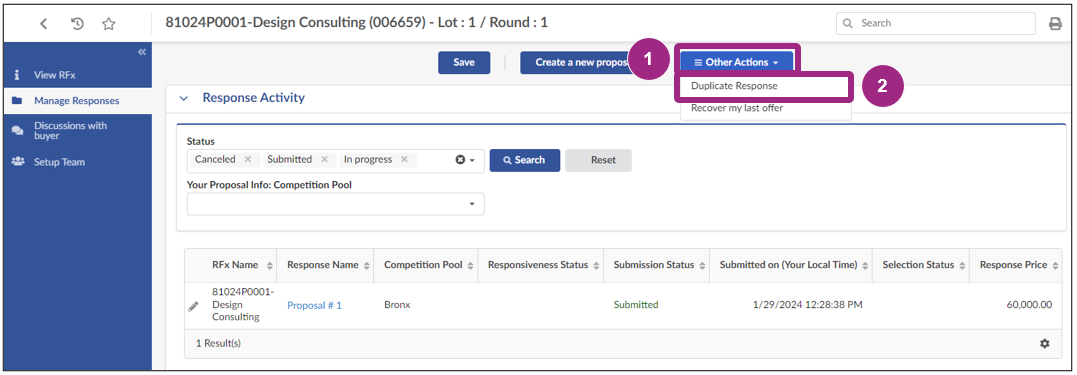
- Click the Other Actions button at the top of the RFx page.
- In the drop-down, select Duplicate Response.
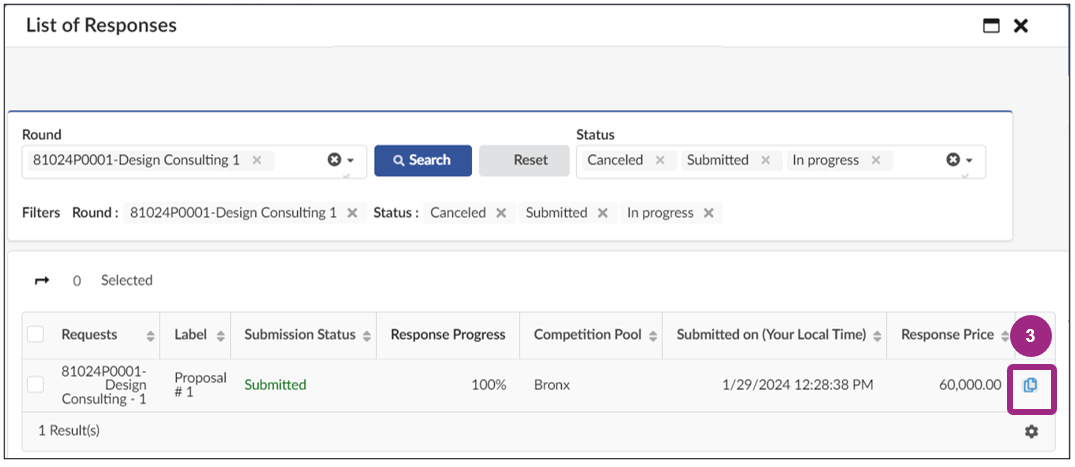
The List of Responses window opens.
- Locate the response you would like to duplicate, scroll to the right, and click the Duplicate this proposal icon.
A pop-up window appears at the top of the page.
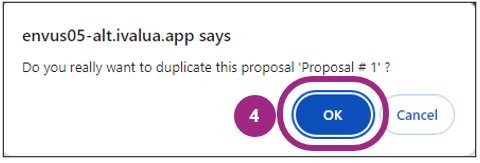
- Click the OK button to continue.
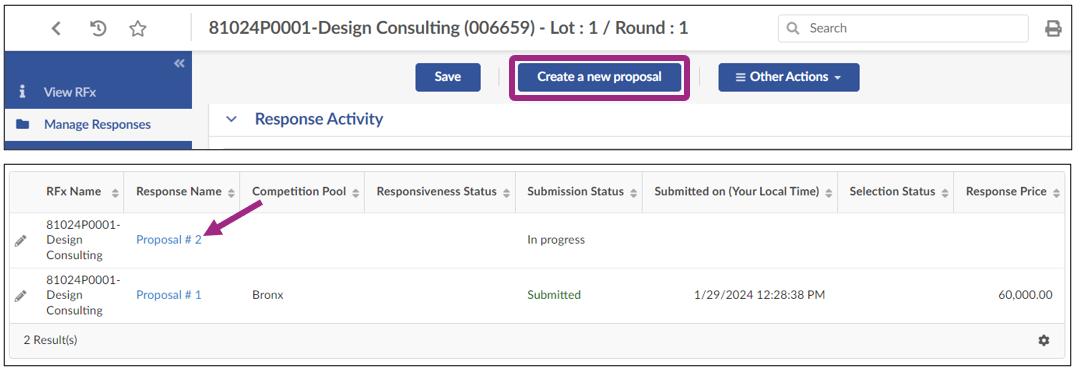
- The page refreshes, and an exact copy of the response appears in the Manage Responses tab. Change the Response Name to your preferred title.

Alternatively, to create a new (blank) response instead of duplicating an existing one, click the Create a New Proposal button at the top of the RFx page which becomes available only after the initial response is submitted. Be sure to change the default Response Name to your preference.
Next Steps
The RFx Response Selection Status will be updated once agency award selections are finalized:
- Selected: Your organization has been selected for an award. The contracting agency will reach out to you with next steps.
- Not Selected: Your organization was not selected for an award.
Note: This process may take several weeks or even months, as responses undergo a thorough evaluation before award selections are made. Vendors will be notified if awarded a contract.


