Approve and Sign the Contract Authoring Document
Learn how to approve the Contract Authoring Document in PASSPort and submit the Contract E-Signature in DocuSign.
Before We Begin
The steps in this guide can be completed by users provisioned with the roles:
- Vendor Admin
- Vendor Contract Signatory
- Vendor Procurement L2
Vendor Contract Agreement Overview
The Authoring Document (or Main Contract Document) is a contractual agreement between the vendor ("Contractor") and the contracting agency on behalf of the City of New York ("City"). It includes the Contract Signature Page and any other relevant documents related to the contract. Once the agency creates the Authoring Document, it is available for vendors to view within the contract's Documents tab. This section outlines the steps vendors take to approve the document once it is submitted to them.
Vendor Approval Task
As part of the contract authoring workflow, agencies can choose to have the vendor review the document before it is sent to the LAW Department for review and approval. If the agency decides to provide a vendor review prior to LAW approval, vendor contacts with the Vendor Admin, Vendor Contract Signatory, or Vendor Procurement L2 user roles receive an email notification.
In addition, the Vendor Approval task appears in the Open Workflow Tasks section of the PASSPort Homepage.
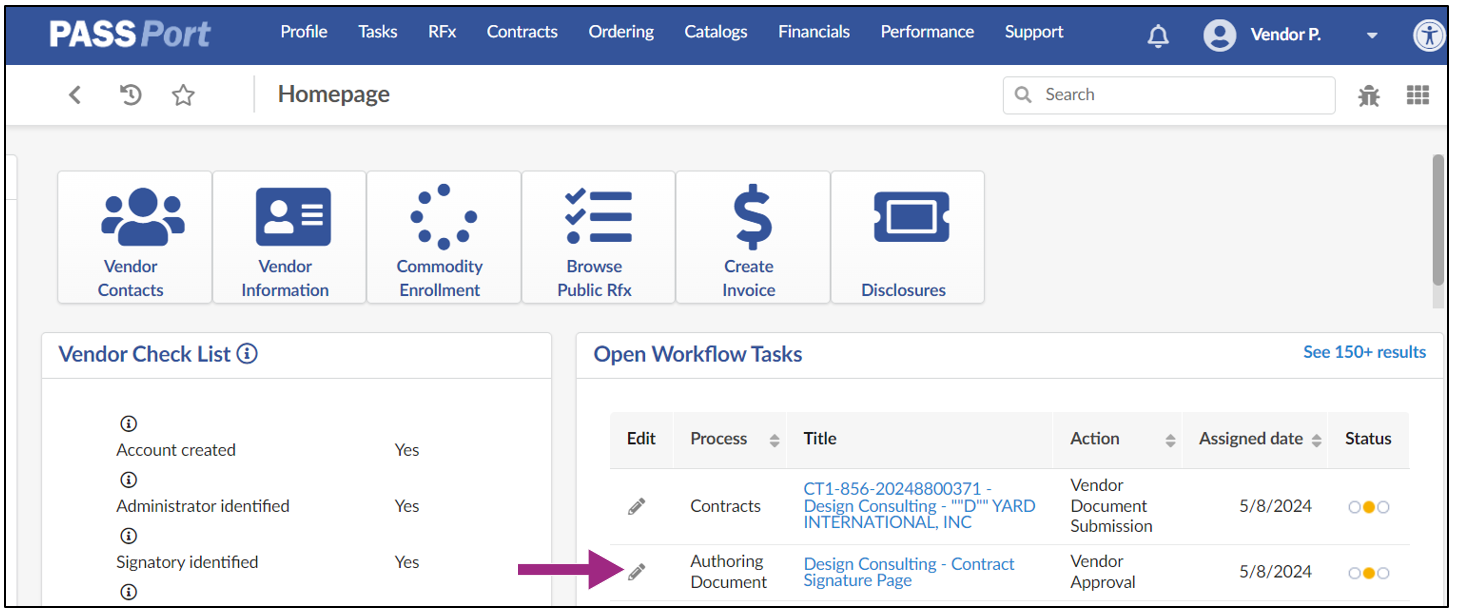
The task can also be accessed from within the contract by following the steps below:
- Go to the Contract Documents tab and scroll down to the Authoring Documents section.
- Click the pencil icon to the left of the contract document.
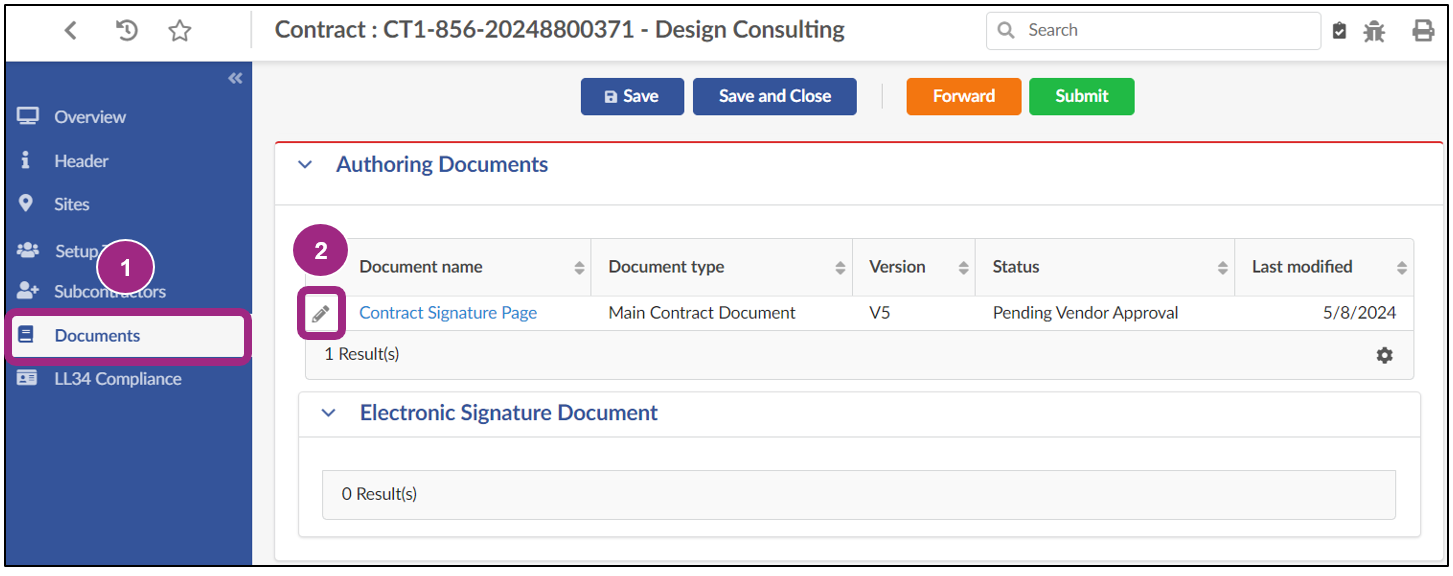
The Document pop-up window opens.
As a vendor, how you edit the document depends on how the agency chose to create the document.
If the agency created the document using the MS Word Tool, a Preview of the document is visible at the bottom of the Document window. However, it can only be edited by clicking the Edit Document button near the top of the page.
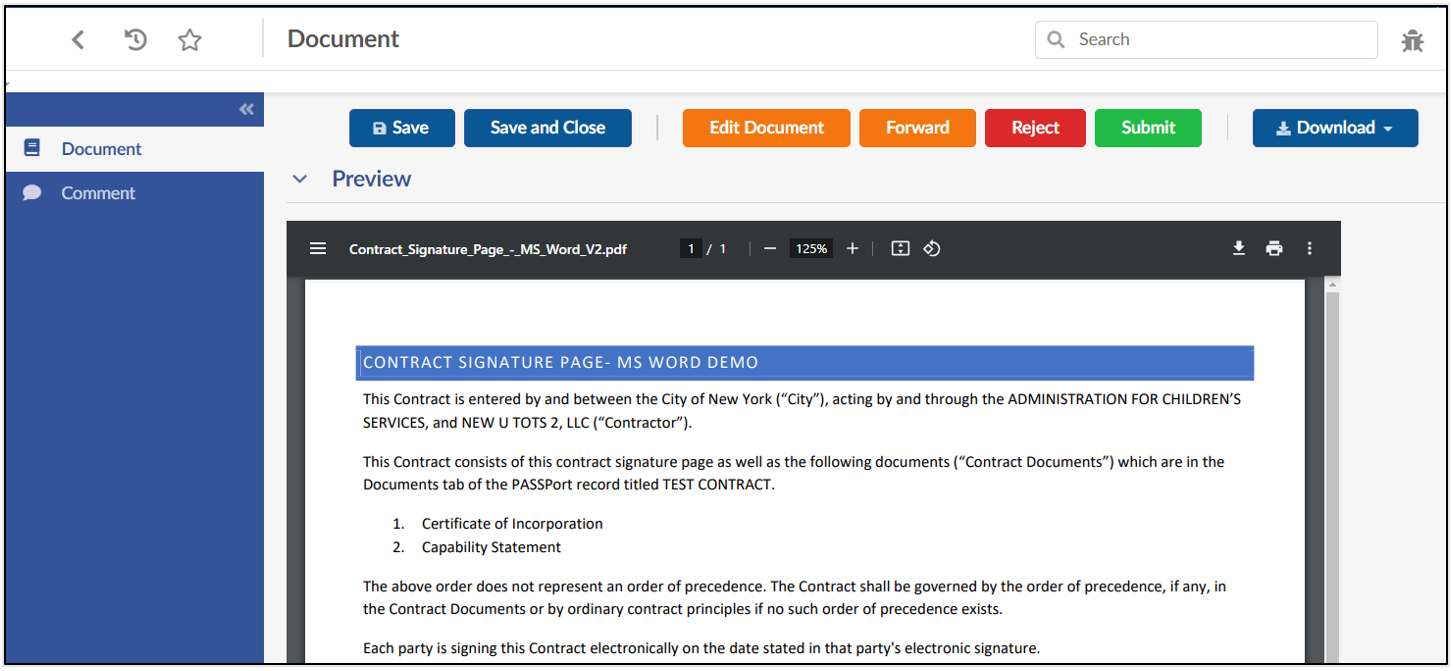
If the agency created the document using the Native Authoring tool, meaning it was created directly in PASSPort, the document can be edited directly on the Document page.
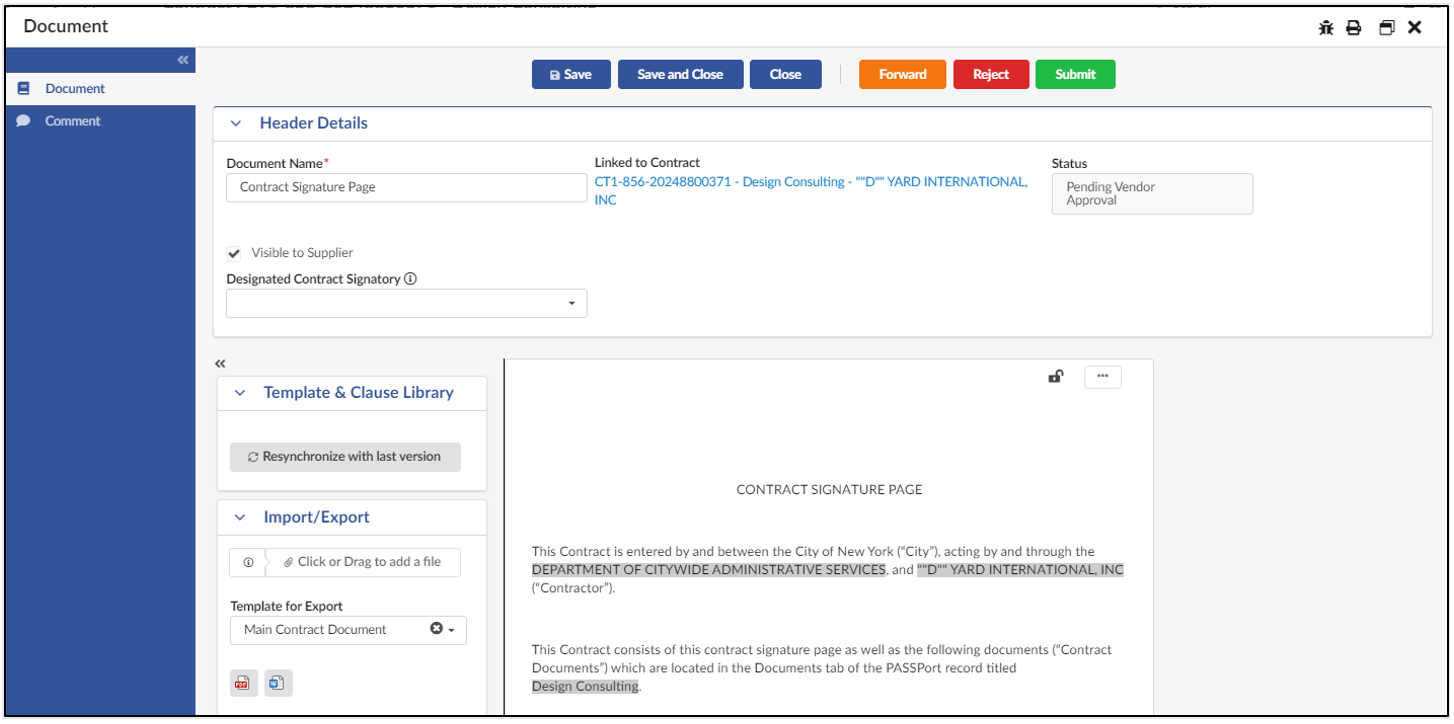
Follow the steps that correspond with the document creation tool the agency selected:
MS Word Tool
-
Scroll down to the Preview section to view the previously uploaded document.
Documents in MS Word can only be viewed and cannot be edited within PASSPort.
-
Click the Edit Document button near the top of the page.
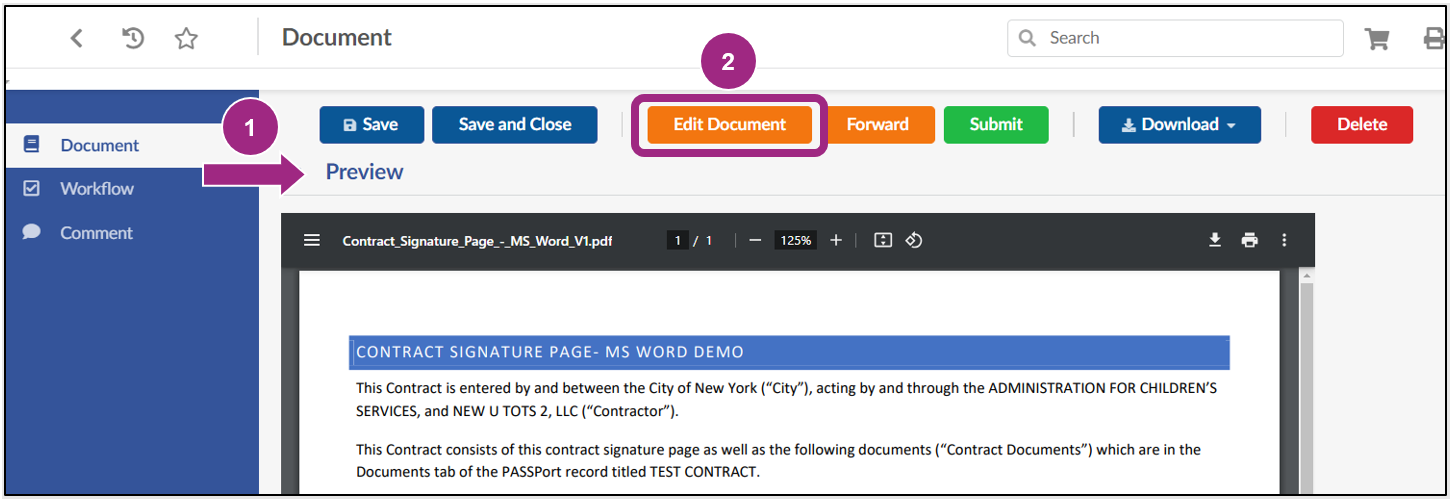
A dialog box appears at the top of the page.
-
Click the Open Word button to open the document in your computer's Microsoft Word application.
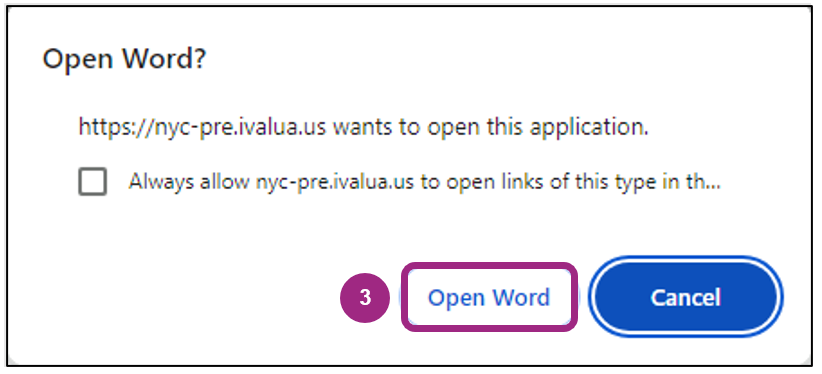
The document opens in read-only mode.
The document file name automatically includes the authoring Document Name + the Version you are viewing. In this example, we are viewing version 2 of the document, so the file name is "Contract Signature Page - MS Word V2".
-
Click the Enable Editing button to start editing.

Important: Once you enable editing, the authoring document page in PASSPort updates and the following changes occur:
- Document (locked by checkout) displays at the top of the page.
- The Edit Document button is no longer visible.
- The Alerts section contains a red blocking alert: "This document is currently checked out by another user. You will be unable to edit or proceed with the workflow until the document is checked back in."
This prevents multiple users from editing the document at the same time.

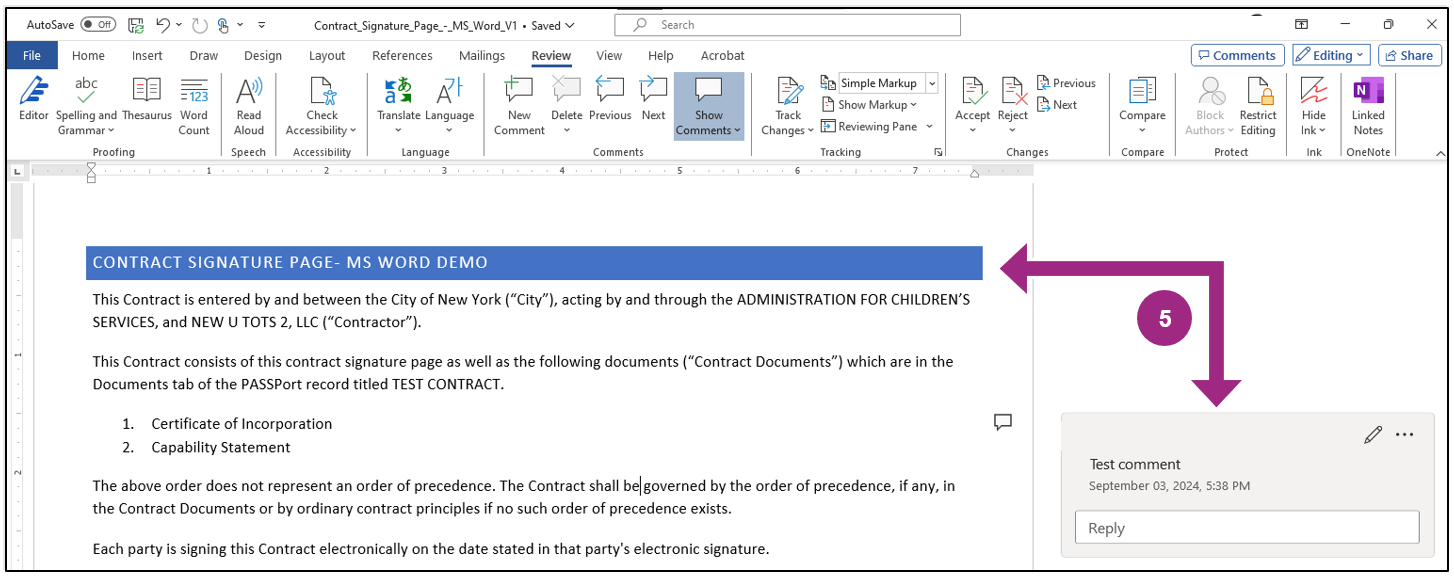
- Make any necessary edits to the document. You can also leave comments and respond to comments as you would in a typical Word document.
-
Click the Save icon in the top left corner of the page.
Note: If you do not manually save your work, the document will not update in PASSPort.
-
Click the X button in the top right corner of the page to check the document back in.

If PASSPort does not automatically refresh, refresh the browser
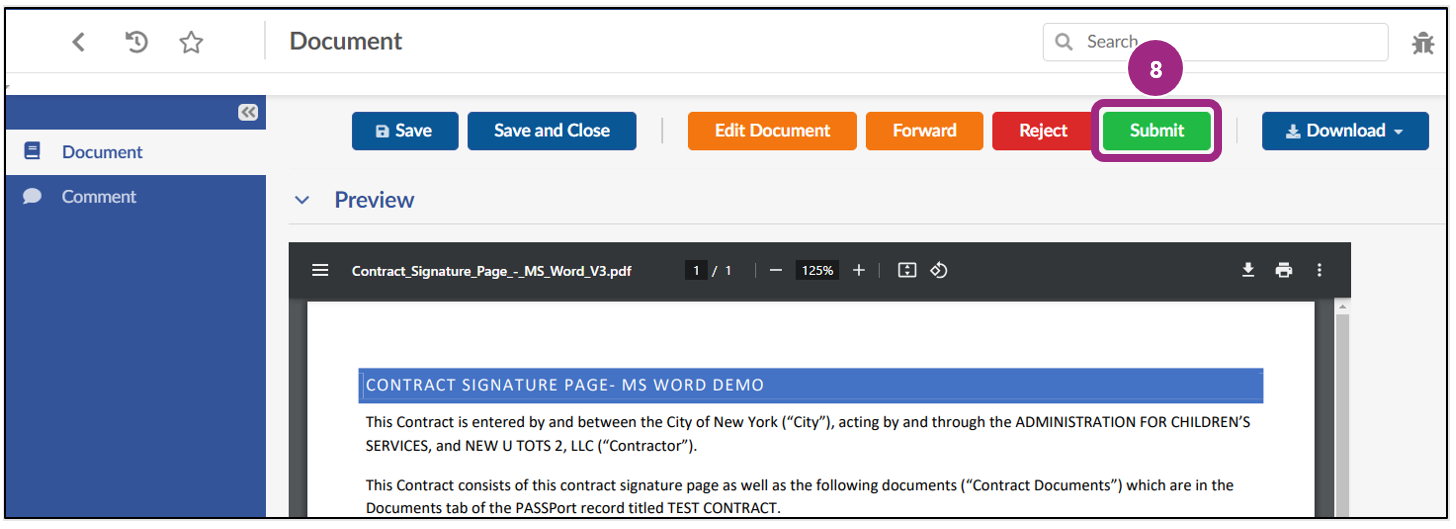
Saved edits will appear in the Preview section.
- Click the Submit button near the top of the page to return the document to the agency.
Native Authoring Tool
The Contract Signature Page is visible below the Header Details section.
-
Review the document.
If changes are needed, click into the document, and start typing.
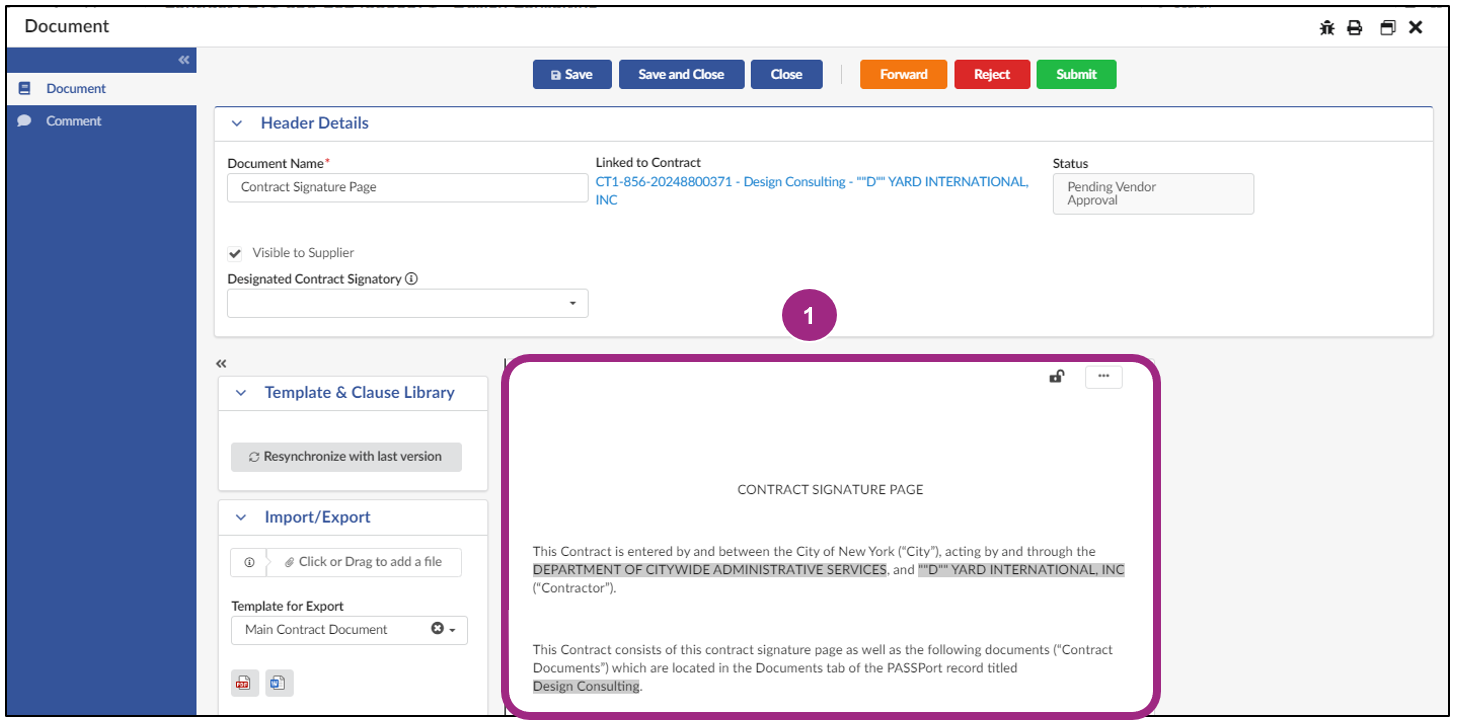
- Once completed, click the Submit button near the top of the page to return the document to the agency.

After the agency completes the Authoring Document and the LAW department provides approval (if required), the agency's Legal Manager sends the contract to the vendor for final review in PASSPort.
Vendor Final Review Task
Vendor contacts with the Vendor Admin, Vendor Contract Signatory, or Vendor Procurement L2 user roles receive an email notification once the Authoring Document is ready for final review in PASSPort.
The Vendor Final Review task appears in the Open Workflow Tasks section of the PASSPort Homepage.

To access the task from the contract:
- Go to the Contract's Documents tab and scroll down to the Authoring Documents section.
-
Click the pencil icon to the left of the contract document.
Note: All contract documents the agency has uploaded are now available to review in the Contract Documents section.
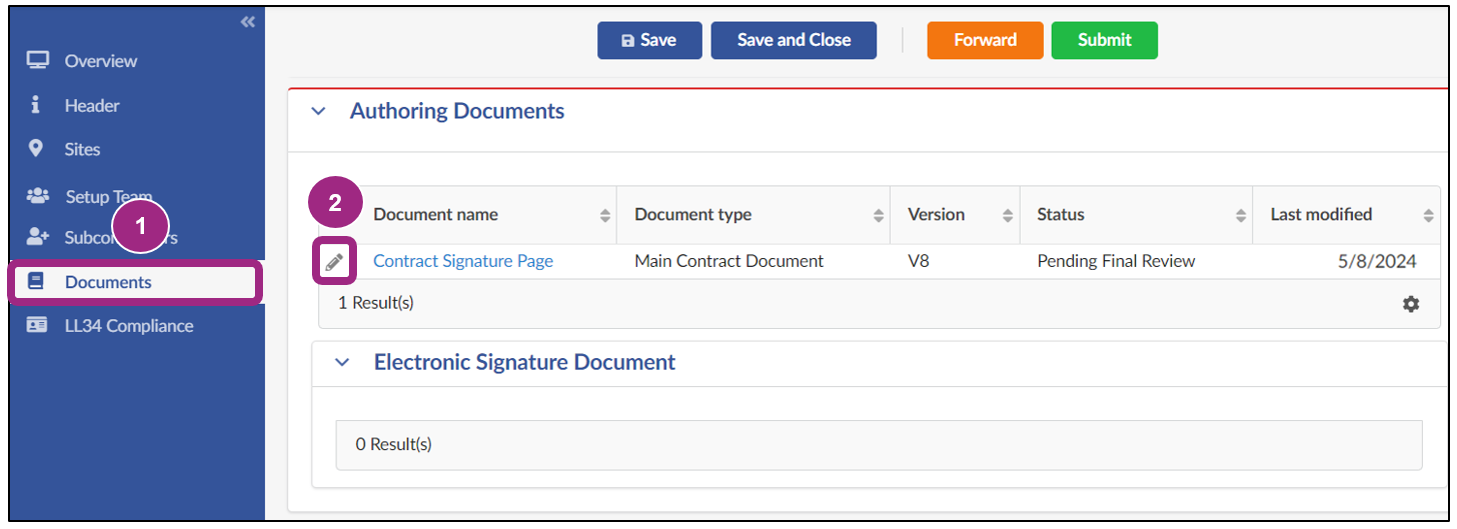
The Document pop-up window opens.
-
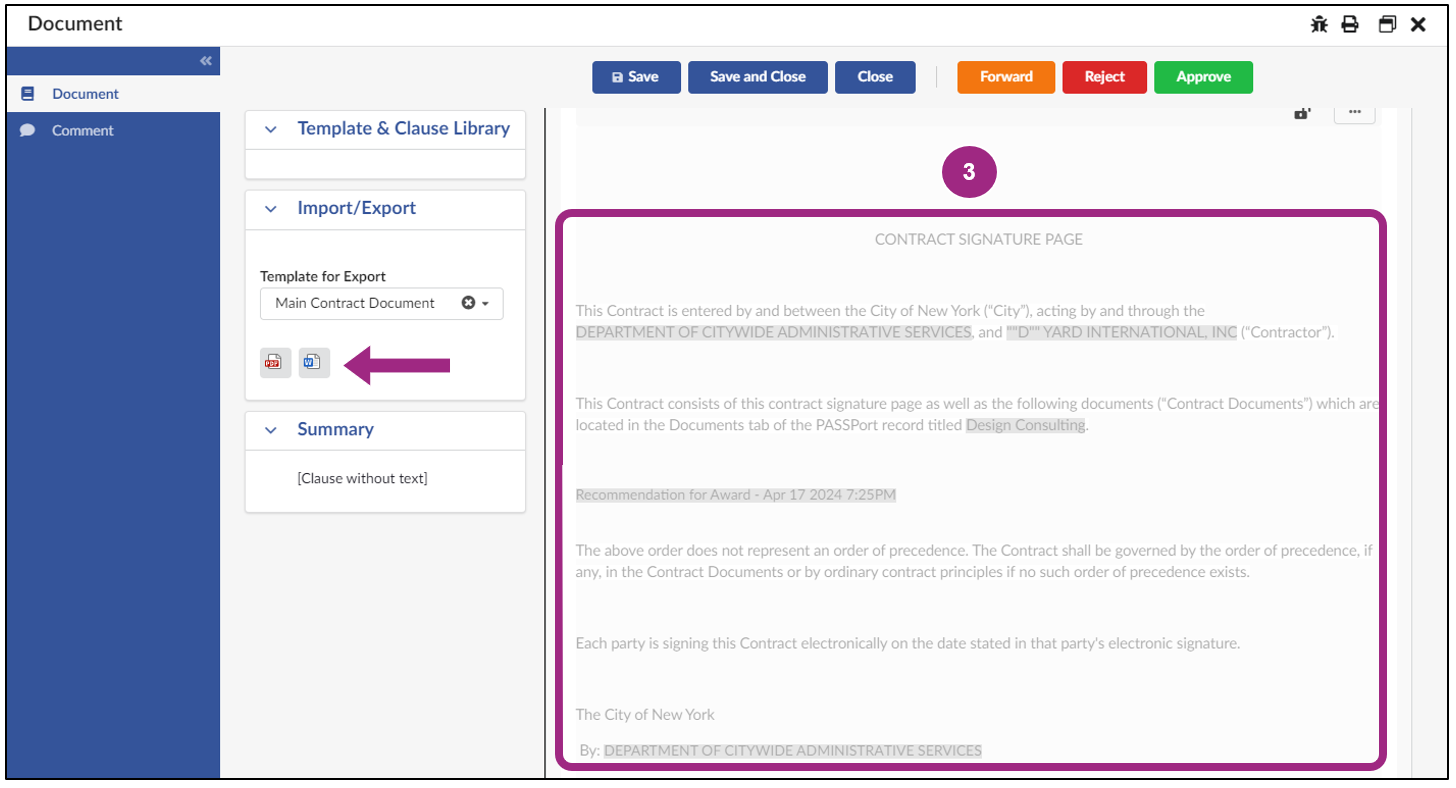
Scroll down to review the Contract Signature Page.
At this point, the document is read-only and cannot be edited.
Note: To review the Signature Page in PDF or Word format, click the PDF icon or Word icon in the Import/Export section. If the document was created using MS Word, a Download button is visible near the top of the page.
-
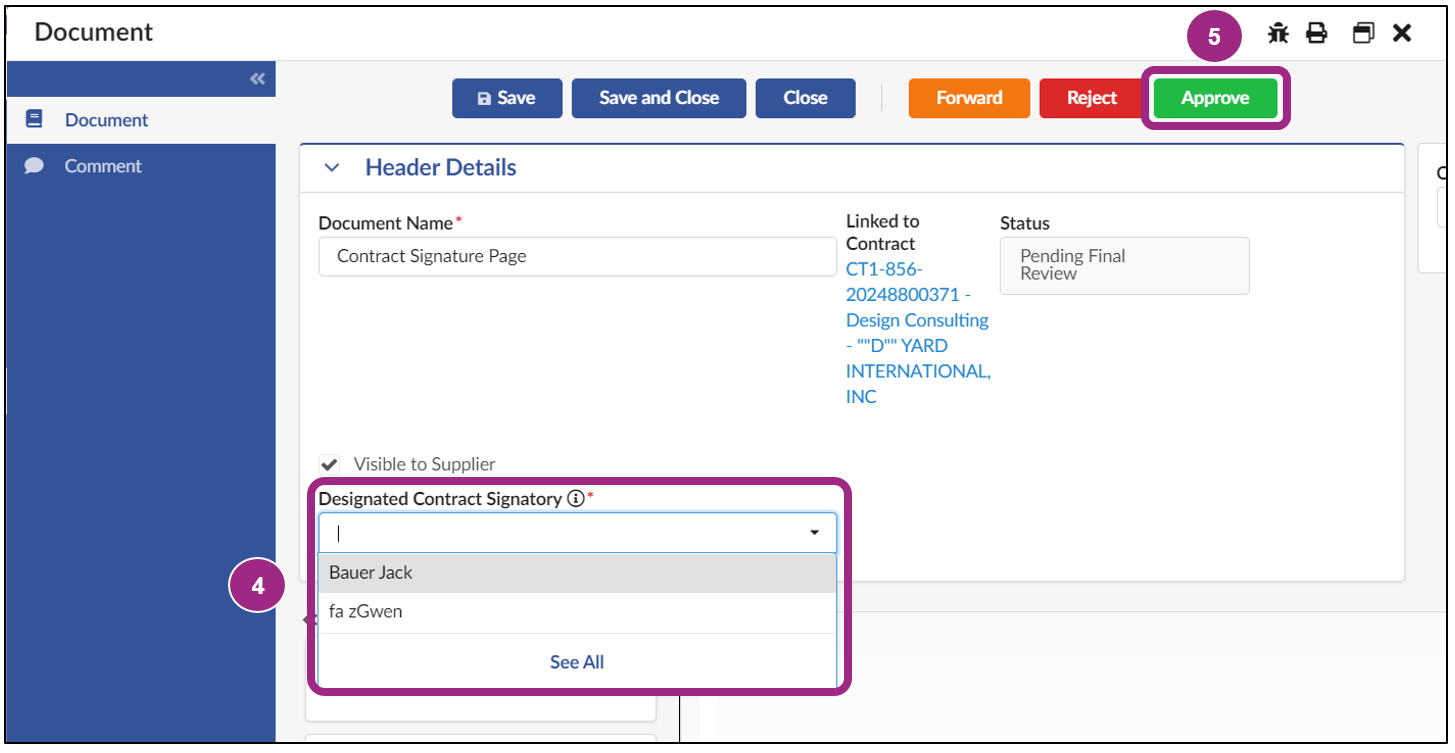
Once the review has been completed, scroll up to the Header Details section and click into the Designated Contract Signatory field to select the user who is authorized to sign the contract document on behalf of the vendor organization. Multiple signatories may be selected.
Important: Only users with the Vendor Contract Signatory role who have been added to the Vendor Team within the Contract's Setup Team tab appear in the Designated Contract Signatory field. If a user is not appearing within this field, confirm the following:
- The user is assigned the Vendor Contract Signatory role in the Vendor Profile.
- The user created a NYC.ID and logged into PASSPort at least once.
- The user was added to the correct Contract's Setup Team.
If all of the above are true and the user's name is still not appearing in the Designated Contract Signatory field, click the Reject button to send the task back to the agency. Be sure to leave a detailed comment explaining why the task is being rejected and request that they resubmit the task to you.
- Click the Approve button at the top of the window. The status changes to Approved in the Authoring Document Status field.
- Click the Close button to return to the Documents tab.

Submit the Contract E-Signature (DocuSign)
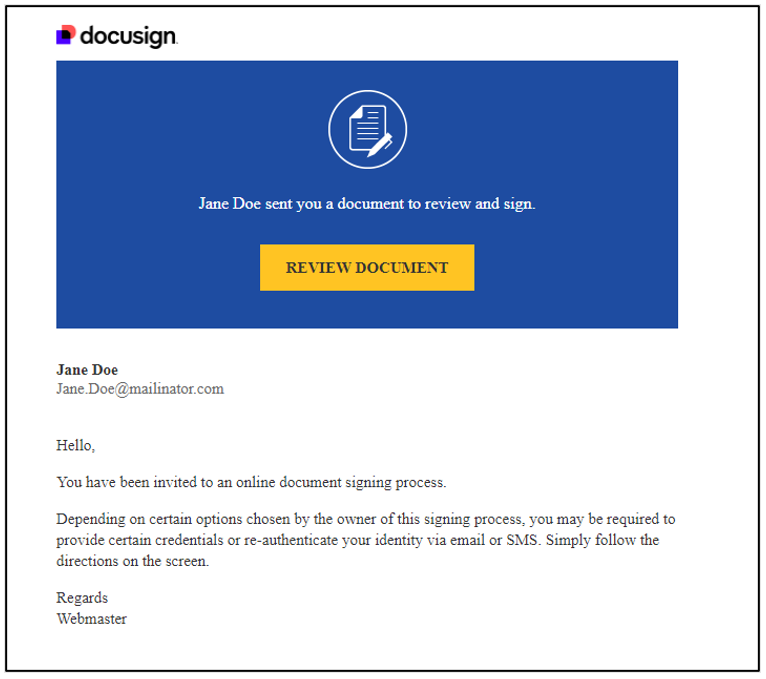
Once the Authoring Document is approved by the vendor, the contracting agency can launch the E-Signature in PASSPort. The designated Vendor Contract Signatory selected by your organization at the point of final review receives an email notification with a link to DocuSign.
Here is a sample notification.
To complete the E-Signature process, follow the steps below.
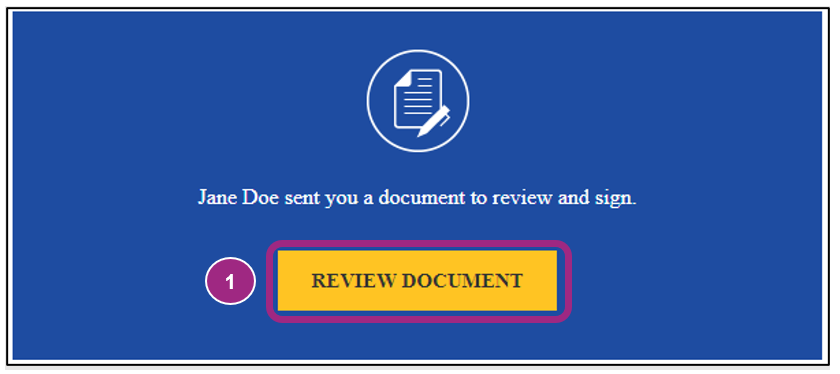
- Click the Review Document button in the email. A new page opens in your web browser.
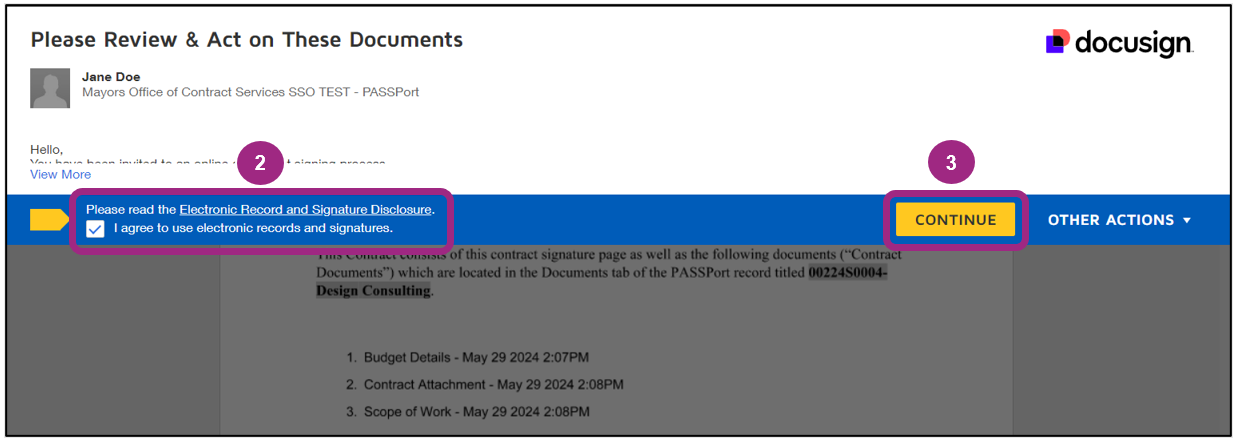
- After reading and agreeing to the disclosure, click the I agree to use electronic records and signatures checkbox.
- Click the Continue button.
-
Review the document and click the Start button near the top left corner of the document to begin the signature process.
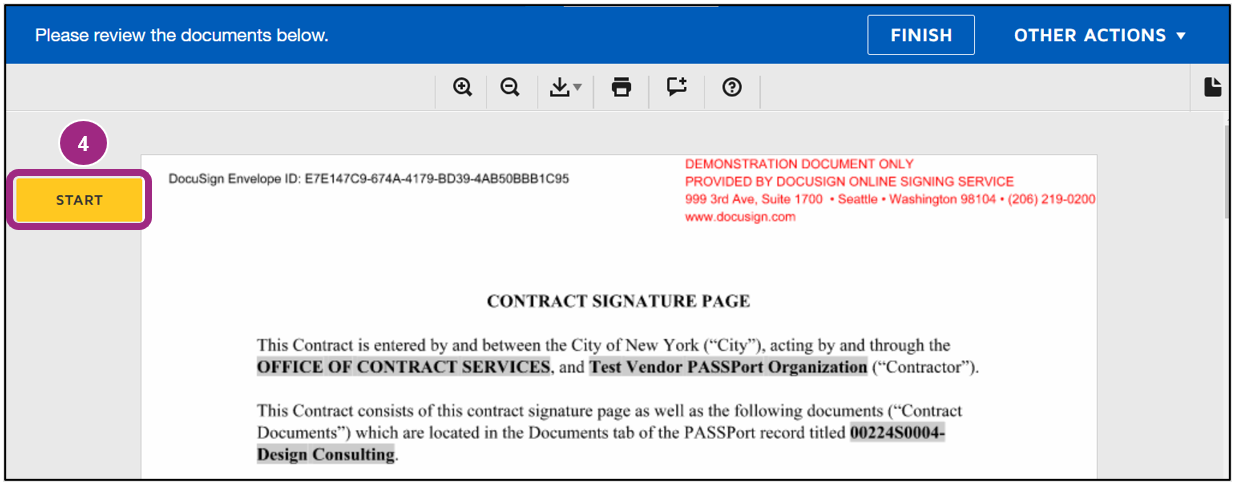
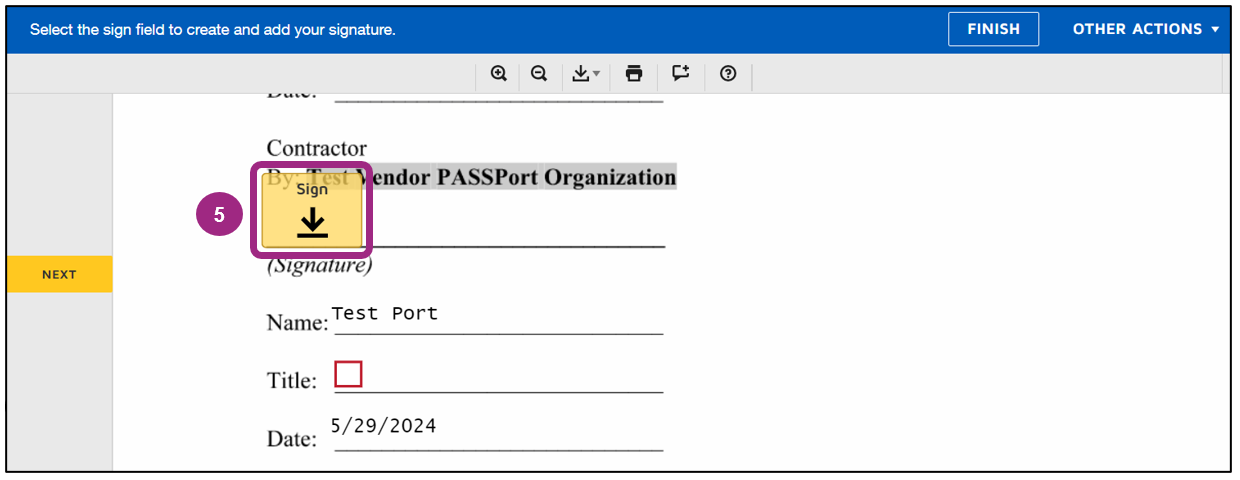
DocuSign skips to the section where the signature should be applied.
- Click the yellow Sign button.
-
In the Adopt Your Signature pop-up window, Preview the signature.
To change a signature, click into the Full Name and/or Initials fields and overwrite its content.
-
When ready to proceed, click the Adopt and Sign button in the bottom left of the window.
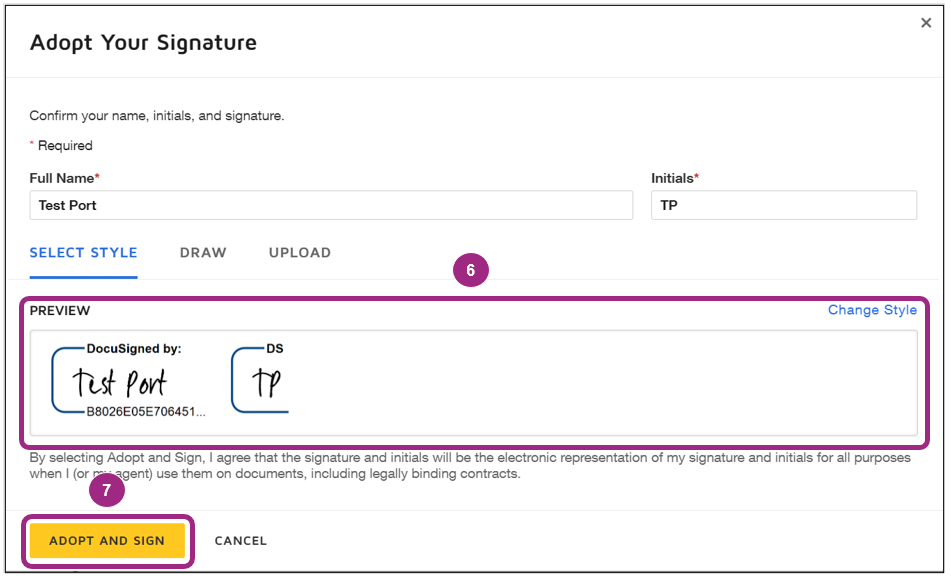
The signature now appears in the document.
-
Enter your title in the Title field.
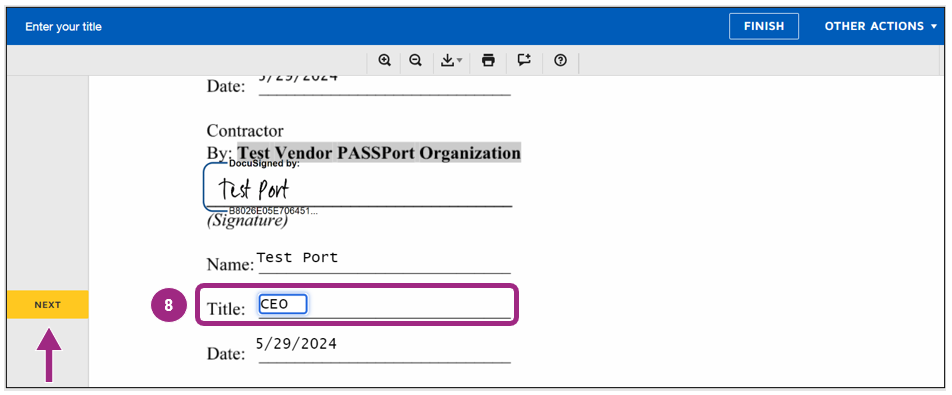
If there are any additional requests for signatures or information, the Next button to the left of the document will be visible. Click the button to complete the remaining required fields.
-
Once all required fields are completed, click the Finish button to complete the signature process.
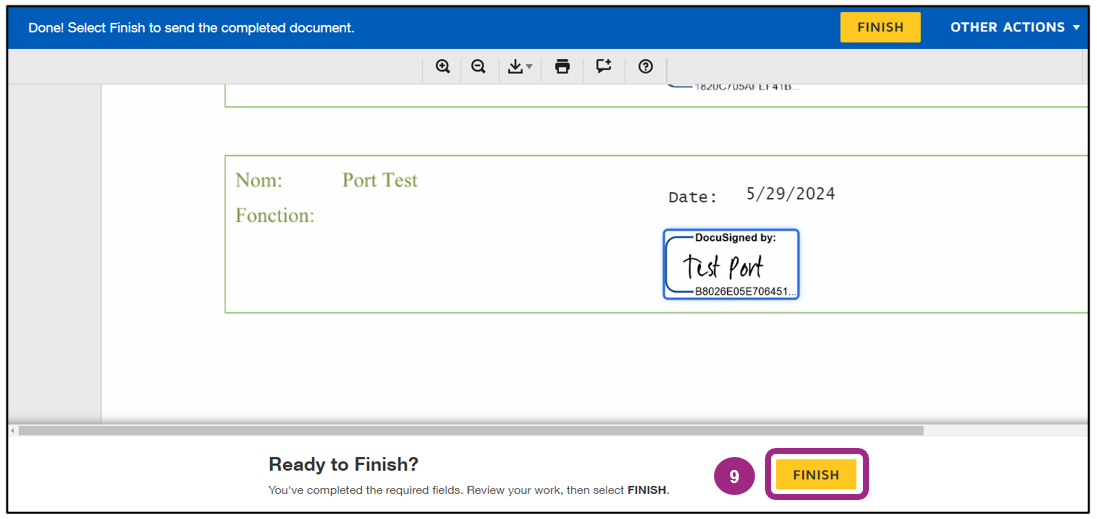
DocuSign sends out an email notification with the subject "Completed: Signature Request" once the document is signed by all parties. The email contains a PDF attachment of the signed document and a link to view the completed document.
Note: If you are unable to locate the DocuSign email in your inbox, be sure to check your spam and junk folders. Reach out to your contracting agency if additional support is required.
Last updated: February 26, 2025


