Complete Vendor Document Submission
Learn how to complete the Vendor Document Submission task. This task is one of the primary vendor actions required to complete the contract registration process in PASSPort.
For a high-level overview of vendor contracts, view Manage My Contract: An Overview.
Before We Begin
The steps in this guide can be completed by users provisioned with the roles:
- Vendor Admin
- Vendor Contract Signatory
- Vendor Procurement L2
The Vendor Document Submission task requires three actions:
- Enter Site Location
- Upload or Link Requested Documents
- Complete LL34 Compliance
The following additional actions, while not required, should also be completed while this task is assigned to your organization:
- Add or Edit Your Contract's Setup Team
- Add or Edit Subcontractor Information
For more information on how to edit your Contract's Setup Team, view Contract Registration: Edit the Vendor Team.
For more information on subcontractor management, view Subcontracting in PASSPort for Vendors.
Locate the Contract
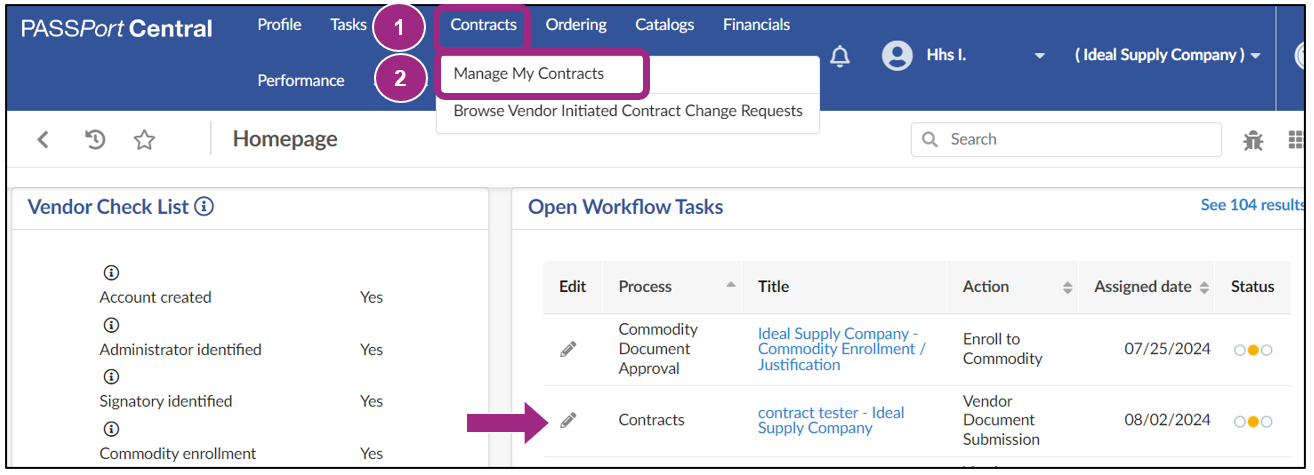
- From PASSPort Central, click or hover over Contracts in the top navigation menu.
-
Select Manage My Contracts from the drop-down menu.
Note: The Vendor Document Submission task can also be directly accessed in the Open Workflow Tasks section of the PASSPort Homepage.
-
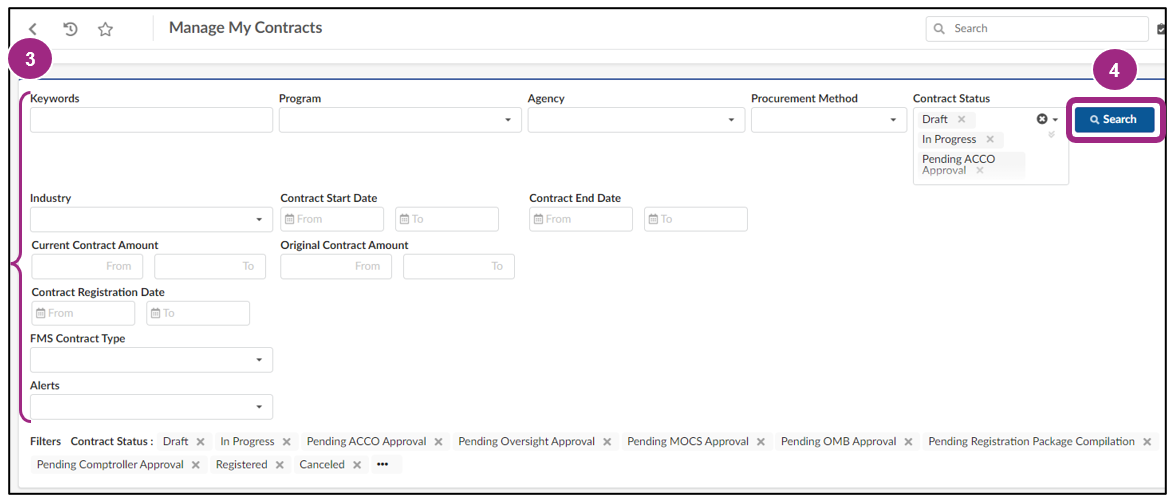
The top of the Manage My Contracts page is a section with various search fields and options. Below the search fields is a search results table listing all your organization's available contracts.
Search results can be filtered by using these search fields:
- Keywords
- Program
- Agency
- Procurement Method
- Contract Status
- Industry
- Contract Start and End Date
- Contract Amount
- Contract Registration Date
- FMS Contract Type
- Alerts
Tip: If known, entering the Contract ID or EPIN into the Keywords field is the simplest way to locate your contract. Alternatively, you can try searching for contracts in “In Progress” status.
- Click the Search button. Results appear in a table below the search filters.
-
Click the pencil icon to the left of the contract to view more details.

The contract Overview tab opens.
Enter Site Location
The Sites tab includes information on the location of the contract project (i.e., the location in which work will be performed).
- Go to the Sites tab in the left navigation menu.
-
In the Location section, click the + Add Address button.
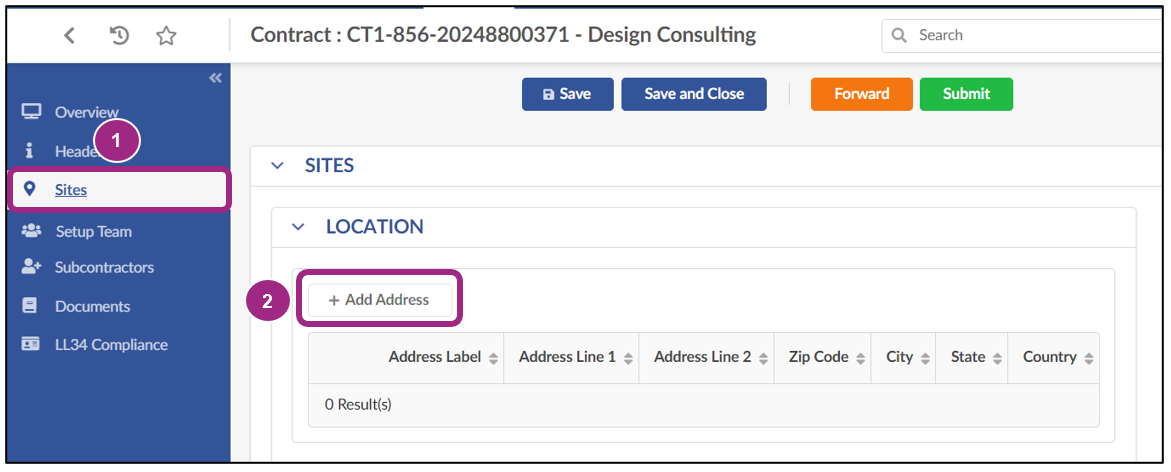
The Address pop-up window opens.
-
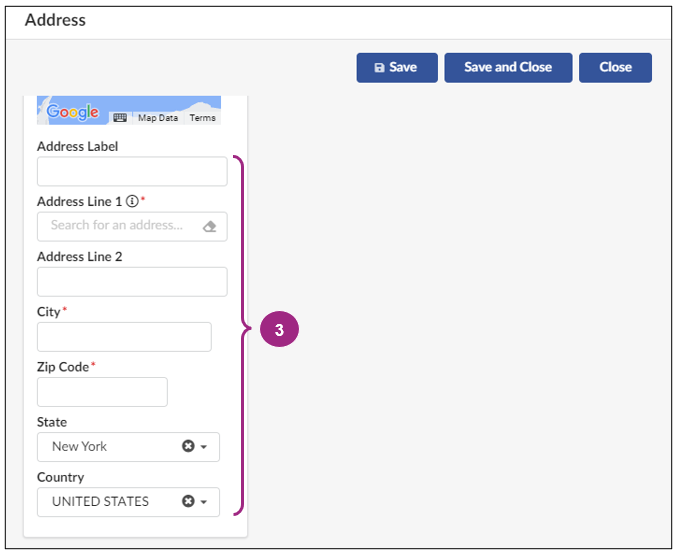
Scroll to the Address section and fill out the required fields indicated by the red asterisk (*).
Tip: Add an Address Label to help identify the address in the system.
Note: Google Maps has been incorporated into the application with Map and Satellite image views. When you enter an address in Address Line 1, the system will locate the address on the map and autofill the Zip Code information.
- Click the Save and Close button at the top of the window to return to the Sites page.

-
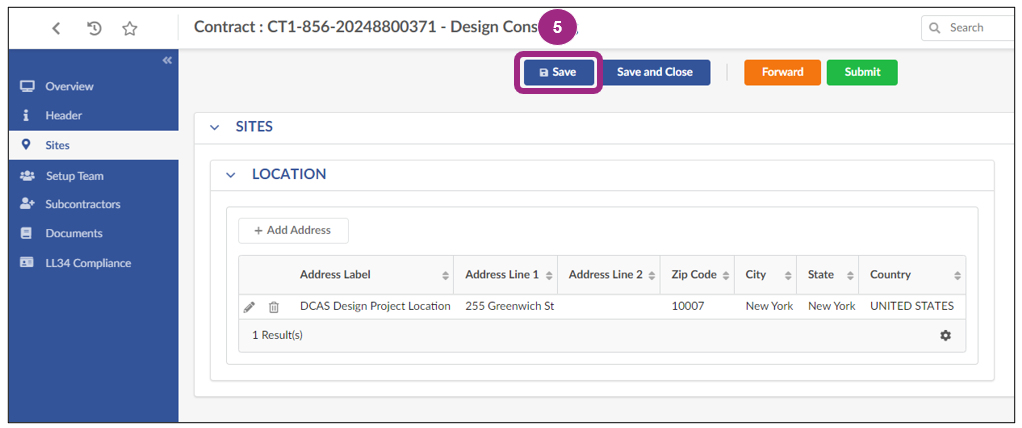
The newly added address now appears in the Location table.
Click the Save button near the top of the page.
Upload or Link Requested Documents
The Documents tab displays any documents the agency requested. Requested documents can be required or optional, depending on what the agency selected. Required documents must be added before the Vendor Document Submission task can be completed.
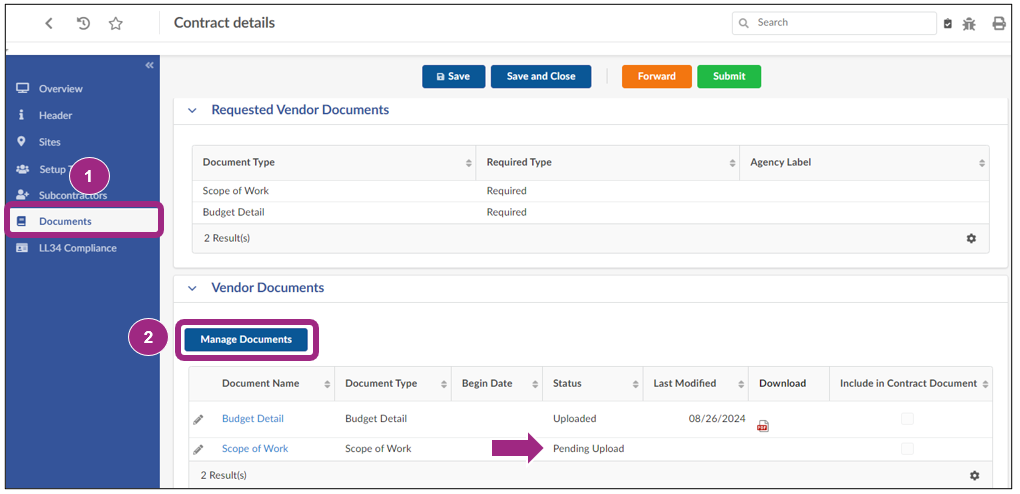
- Go to the Documents tab in the left navigation menu.
-
In the Vendor Documents section, a placeholder for each requested document is visible. The Pending Upload status means the document has not yet been added (by upload or linked from the Vault).
Click the Manage Documents button.
The Manage Documents window opens.
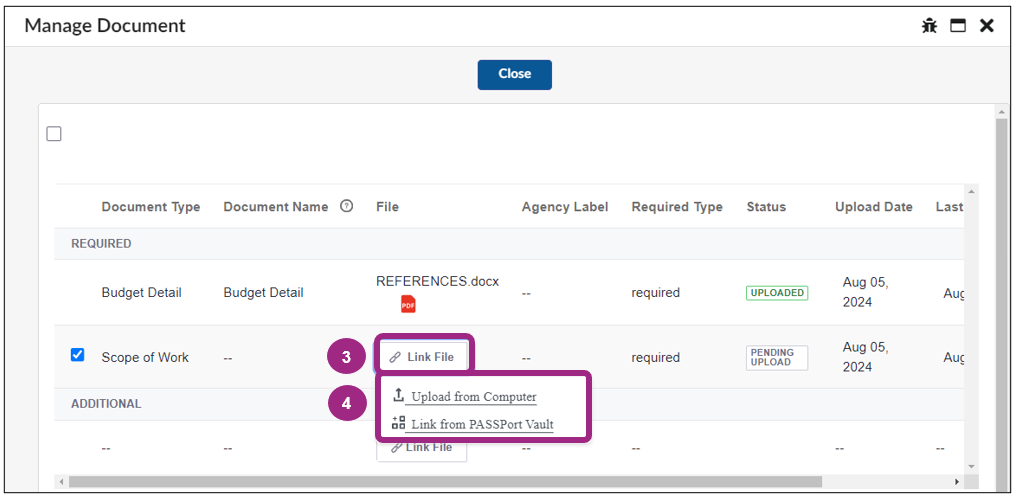
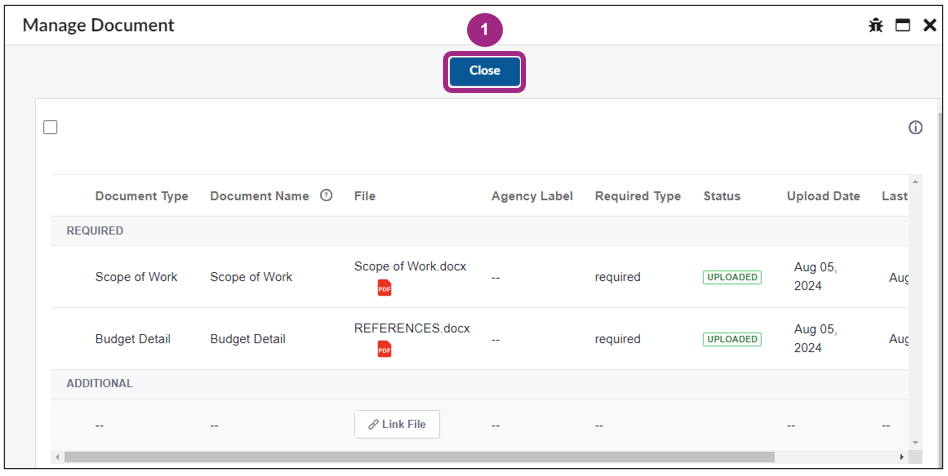
Documents are sorted into three sections: Required, Optional, and Additional.
Documents that were not requested can be added in the Additional section.
- Click the Link File button to add a document.
- Select either the Upload from Computer or Link from PASSPort Vault option.
Upload from Computer
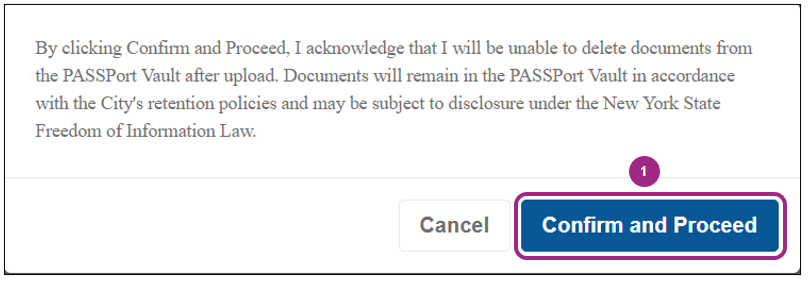
- Read the confirmation message that appears and click the Confirm and Proceed button to acknowledge that you understand documents cannot be deleted from the Vault after upload.
-
In the Upload Document window, click the Select Files button to add a document from your computer.
Note: Up to 10 documents can be uploaded simultaneously, as long as the documents combined do not exceed 300MB.
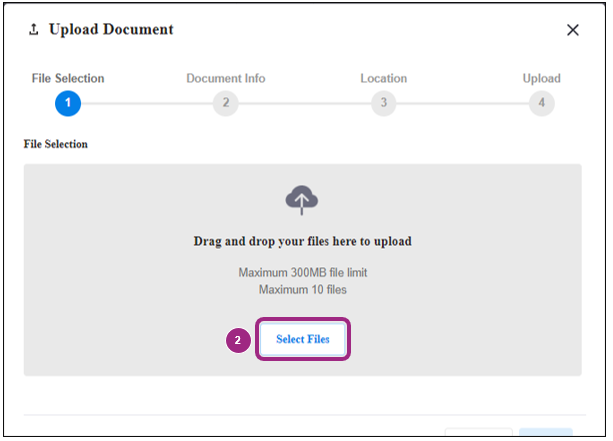
- Once the file is selected, click the Next button.

-
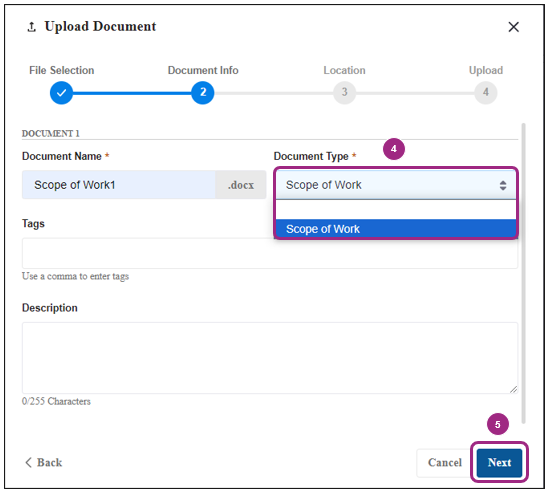
Select the Document Type from the drop-down field.
Note: For requested documents, only the requested Document Type will be available in the Document Type field.
-
Click the Next button.
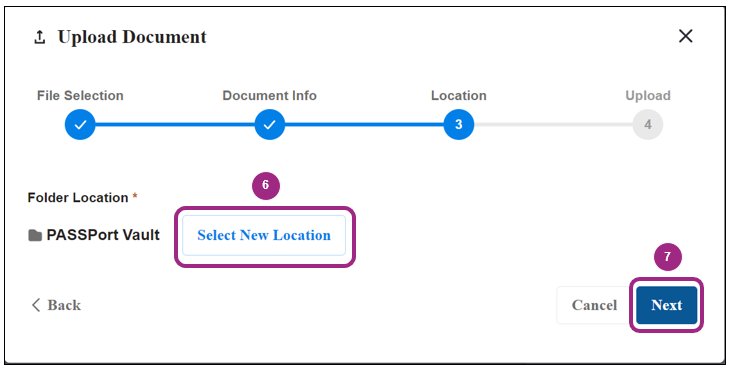
By default, the document is saved to a folder named PASSPort Vault.
- Optional: Click Select New Location to save the document to a different folder.
-
Click the Next button
The pop-up closes and the newly uploaded document appears on the Manage Documents screen.
Link from PASSPort Vault
If you are linking a requested document, only documents in your organization's Vault with the requested Document Type will be visible on the Link from PASSPort Vault screen. Otherwise, for non-requested documents, all document types will be available to choose from.
- Click the radio button in the left-most column of the document you would like to link.
-
Click the Select button at the bottom of the screen.
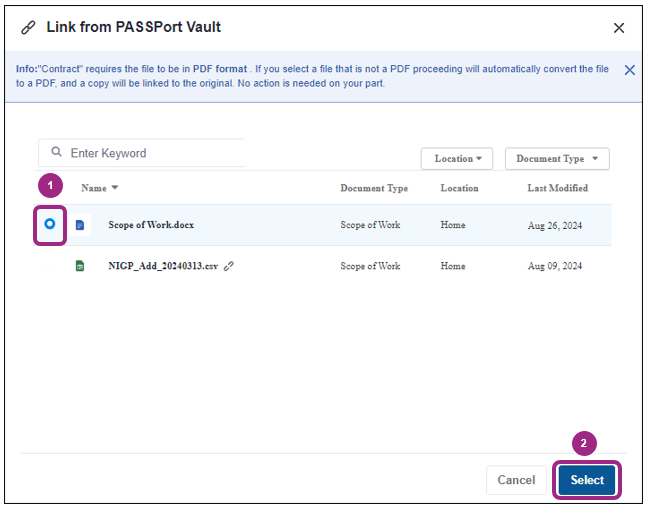
The pop-up closes and the newly linked document appears on the Manage Documents screen.
Note: If a non-PDF document is uploaded or linked from the Vault, the document is automatically converted to PDF and a copy will be linked to the original.
Complete the Upload
- Once the document is added, you can upload or link additional files or click the Close button to return to the Documents screen.
-
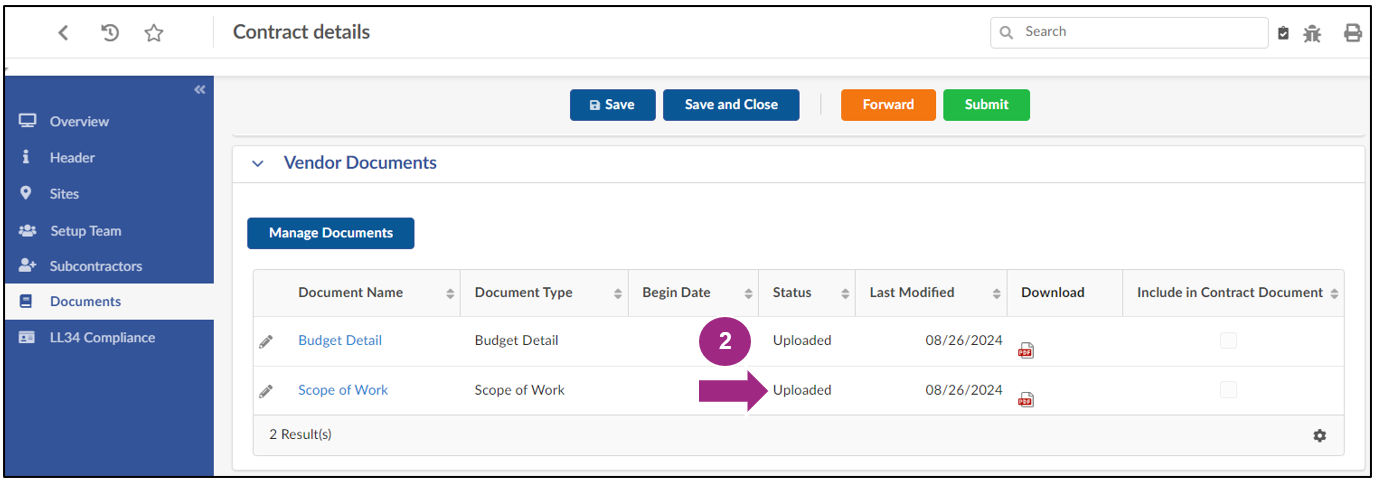
The document's status will change from Pending Upload to Uploaded.
Details about the document including the Document Name, Document Type, Begin Date, Status, and Last Modified are displayed in the table.
You can download the document by clicking on the PDF icon in the Download column.
- Click the Save button near the top of the page.

Complete LL34 Compliance
If the contracting agency required vendors to submit LL34 Compliance information as part of the RFx response, that information will transfer over to the Contract's LL34 Compliance tab.
Otherwise, vendors will be required to provide information on their organization's leadership during the Vendor Document Submission phase of the contract registration process.
Note: Principal Officers, Principal Owners, and Senior Managers must be identified in the Vendor Profile Contacts tab before they can be selected within the LL34 Compliance tab.
For more information on how to identify LL34 contacts in your vendor profile, view Identify Your Organization's LL34 Contacts.
- Go to the LL34 Compliance tab.
-
In the Principal Officers section, use the unlabeled drop-down field to add existing Principal Officers.
If your organization does NOT have a person who acts in the capacity of a CEO, a CFO, or a COO (or equivalents such as President, Treasurer, etc.), click the checkbox for the role to the right of the Excluded Officers label.

-
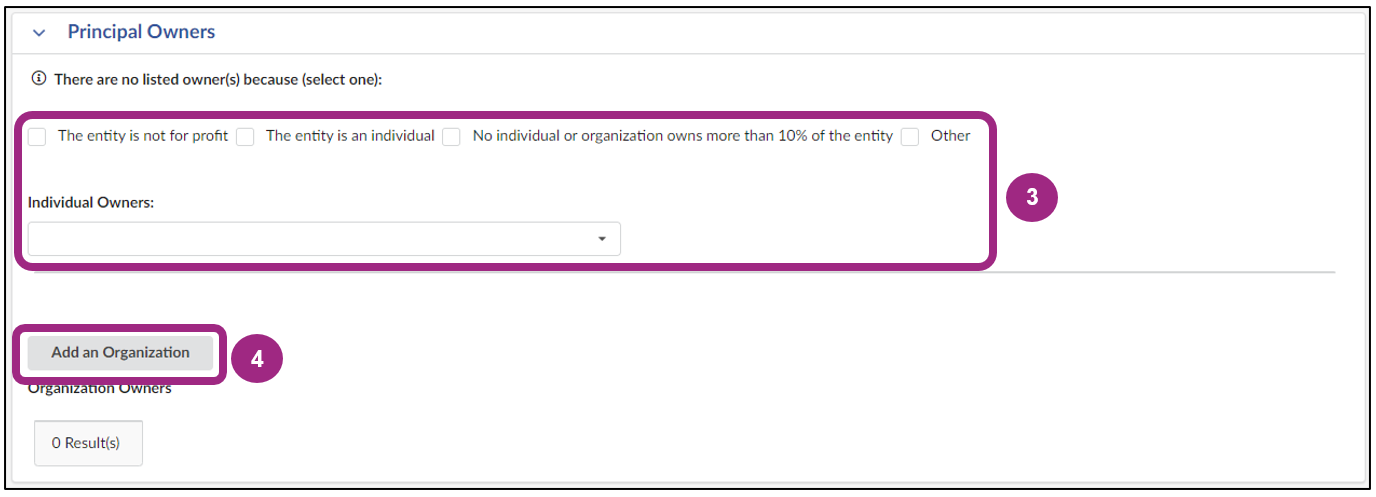
Scroll down to the Principal Owners section. If your organization does not have a Principal Owner, click the checkbox for one of the options below the text, "There are no listed owner(s) because (select one)":
- The entity is not for profit
- The entity is an individual
- No individual or organization owns more than 10% of the entity
- Other
If your organization can list a Principal Owner, click the Individual Owners drop-down field to select the owner's name from the drop-down menu.
-
If your organization is owned by another organization, click the Add an Organization button below the area listing individual owners. The LL34 Organization Extranet window will pop up, where you can enter the owner's Organization Name.
-
Scroll down to the Senior Managers section. Click into the unlabeled drop-down field to select a Senior Manager.
Note: At least one Senior Manager must be selected.

-
Once all sections have been completed, click the Save button near the top of the page.

Submit the Vendor Document Submission Task
Once all required sections of the contract have been completed, the contract can be submitted to the agency for review. Click the green Submit button near the top of the page.

The contract returns to the agency who reviews the submitted documents for accuracy. If there are any issues with the documents provided, the agency may return the task back to your organization for correction. You will receive an email notification from PASSPort if the task is returned to you.
If the agency accepts the documents, the contract moves forward in the registration process. The timeline for contract registration can vary from weeks to months. Refer to the Award Milestones Tracker in your contract's Overview tab to follow the contract's path toward registration.
If you have additional questions about your contract, reach out to the Agency Contact listed in the contract's Overview tab.
Last updated: February 21, 2025


